

> Editorial Note: I’m Erin Schwartz, and I cover home decor with a bias toward what actually works in a real room. The guidance here weighs scale, layout, and materials against Apartment Therapy and Wirecutter coverage rather than styling a space that nobody lives in.
The mistake almost everyone makes is reaching for a brush. Wicker’s woven gaps swallow bristles and trap thick beads that crack within a season, which is why a fine mist beats a brush every time. Before you spend a weekend on it, confirm what you’re working with: our guide on rattan vs wicker outdoor furniture explains the material difference, why is my wicker furniture cracking covers whether the piece is even worth saving, and whether it’s a single wicker chair or a full wicker patio furniture sets the prep is identical. Match the finish to your room with how to pick a paint color for a small room, and reach for outdoor-rated patio paint if the piece stays outside.
Know Your Wicker Before You Open a Can
The paint you choose depends entirely on what the wicker is made of, so identify it first. Natural wicker (rattan, reed, willow, or paper fiber) absorbs moisture and swells, so it needs a sealing primer and a breathable finish. Synthetic resin wicker repels water, so it needs a paint made to grip plastic, not raw fiber.
A quick check settles it. Press a hidden strand with your thumbnail. Natural fiber dents and feels dry and slightly fuzzy up close, while resin stays smooth and springs back.
Paper fiber wicker, common on vintage indoor pieces, unravels at cut ends and should never live outdoors once repainted. Apartment Therapy makes the same call: know the fiber before you buy the can.
Do You Have to Strip the Old Paint First?
Usually no. Sound, well-adhered paint just needs cleaning and a light scuff, not full removal. Stripping is only worth it when the old coat is peeling, flaking, or so thick it has already filled the weave.
Start by vacuuming the crevices, then wash with a mild soap solution and let it dry for a full 24 hours, because trapped moisture is the number one cause of bubbling later. For loose or crumbling paint, a stiff nylon brush and 220 to 400-grit sandpaper knock off the flakes without gouging the fiber. Don’t sand natural wicker aggressively. You want a dull surface for grip, not bare, raw reed that drinks paint unevenly.
Primer: Skip It or Not?
Prime almost every time. A bonding primer is the layer that stops peeling, and skipping it is why most repaint jobs fail within a year. Bare natural fiber and slick resin both need it, just for opposite reasons.
For raw or previously unpainted wicker, use a stain-blocking primer so tannins don’t bleed through a light topcoat. For glossy resin, a plastic-bonding primer gives the finish something to key into. One thin coat is plenty.
A spray primer reaches the woven undersides a brush can’t, and Wirecutter’s painting coverage points to the same principle: adhesion is set by the primer, not the color coat. Let it cure for the time on the label, typically one hour to touch.
What Paint Actually Sticks to Wicker
Spray paint wins on wicker, full stop. The reason is coverage, not convenience. A brush leaves the deep weave patchy and loads the high points, while an atomized coat wraps every strand evenly.
Match the paint to the location. For indoor pieces, an acrylic latex or a general-purpose spray enamel holds up fine. For anything outdoors, choose a paint labeled for exterior use so it flexes through temperature swings instead of cracking, and confirm it meets an ASTM weatherability rating if the piece takes direct sun.
Oil-based enamels give the hardest shell but yellow over time on white. Chalk-style paint looks great indoors but needs a sealing wax or topcoat, or it rubs off. Whatever you pick, thin it only per the can, because over-thinned paint runs straight through the weave.
How to Spray-Paint Wicker, Step by Step
Work outdoors or in a ventilated garage on a dry day, ideally between 50 and 90°F with humidity under 50%, so the finish flashes off cleanly. Set the piece on painter’s pyramids to lift it off the drop cloth and let you flip it without smudging. Then move through it in order.
First, hold the sprayer or can 8 to 10 inches from the surface and keep it moving. Second, lay down light coats, not one heavy pass. Three thin coats beat one thick one that pools in the joints.
Third, hit the undersides and back legs first, then the visible surfaces last. Fourth, wait the recoat window on the label, usually 10 to 20 minutes, between passes. Let the final coat cure a full 24 hours before you sit on it. Patience here is the whole job.
What You’ll Need
The tools below cover the two things that actually decide the result: even atomization and a way to reach every angle. A sprayer gives the fine mist wicker demands, and painter’s pyramid stands lift the piece so you can coat the underside in one session. All five carry a 4.4 rating or higher.

Pros
- Three nozzle sizes (1.3/1.7/2.0mm) cover all automotive and furniture painting needs
- Low pressure operation (2.0-3.5 bar) compatible with mid-sized home air compressors
- Includes complete accessory kit with air regulator, separator, and cleaning tools
- Wide spray pattern (280mm) for efficient coverage on large surfaces
- Ergonomic trigger and balanced weight reduce hand fatigue during extended use
Cons
- Plastic cup may not be as durable as metal alternatives for heavy professional use
- No customer reviews yet to verify real-world performance claims
- Requires some technical knowledge to adjust nozzle sizes and air pressure correctly
This LVLP spray gun bridges the gap between beginner-friendly HVLP systems and expensive professional gear. The three included nozzles mean you can tackle an entire furniture restoration or car repaint project without switching equipment. The 1.3mm handles your final clear coat with glass-smooth results, the 1.7mm lays down color evenly, and the 2.0mm powers through primer work.
What sets this apart is the low air consumption. Most home garage compressors in the 20-30 gallon range can run this gun continuously, whereas traditional HVLP systems require costly upgrades. The included air regulator and oil-water separator are essentials that cheaper kits skip, and the wide 280mm fan pattern means you will cover a dresser top or car door in half the passes.
If you want professional-looking painted finishes on furniture or automotive projects without investing in an industrial air compressor, this kit delivers the control and efficiency to make it happen.
Styles it works with: Industrial, Modern Farmhouse, Mid-Century Modern refinishing projects, any style requiring custom painted furniture or automotive restoration
Best placed in: Workshop or garage with proper ventilation, outdoor spray area for furniture refinishing, detached studio space with exhaust fan
May not suit: Apartments without dedicated workshop space, homes without adequate ventilation for paint fumes, indoor spaces where overspray cannot be contained, beginners with no prior spray gun experience or air compressor setup
Buy it if:
- You are refinishing furniture or restoring a car and need professional results without professional equipment costs
- Your air compressor is in the 20-30 gallon range and cannot support high-CFM HVLP guns
- You want one gun that handles primers, base coats, and clear coats by swapping nozzles
Consider waiting if:
- You need verified customer reviews before committing to a new spray gun brand
- You want to see the plastic cup durability tested over multiple projects first
Skip it if:
- You need a metal cup for professional daily use in a body shop environment
- You have no air compressor or yours is under 20 gallons
- You have never used a spray gun and need a simpler airless electric sprayer instead
Check the latest price and availability on Amazon before it sells out.
Pros
- Speeds up painting workflow by eliminating drying wait times between sides
- Compact size works well for small craft projects and cabinet door painting
- Lockable system provides stability for heavier or oddly shaped items
- Reusable and solvent-resistant for long-term use across many projects
Cons
- No customer reviews yet to verify real-world performance and durability
- May leave small indentation marks on softer wood surfaces under heavy weight
- Requires flat, stable work surface for the locking tabs to function properly
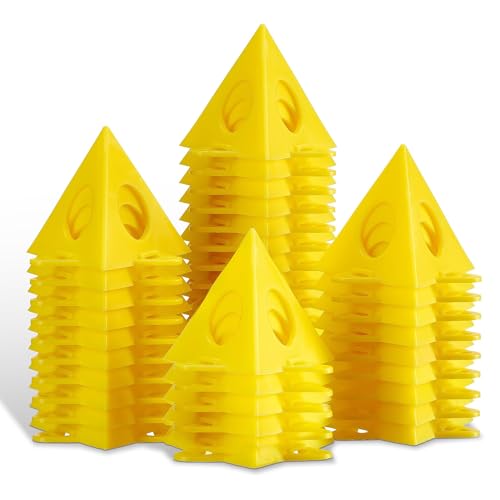
If you have ever painted furniture or cabinet doors, you know the frustration of waiting hours for one side to dry before flipping it over. These little pyramids solve that problem by lifting your project just enough to paint every surface in one go. The minimal contact points mean no smudges, no stick marks, and no ruined finishes.
The lockable tab system is smarter than basic pyramid stands. You can connect them together for added stability on larger pieces like cabinet doors or tabletops. They nest neatly when you are done, so they do not take up much space in your garage or craft room. At under $8 for 36 pieces, you get enough stands to handle multiple projects without constantly moving them around.
If you want faster furniture refinishing without dealing with drying racks or sawhorses, this set delivers.
Styles it works with: This is a tool, not decor, but it helps you achieve professional finishes on DIY projects for Modern Farmhouse, Scandinavian, Boho, or Cottage style furniture and cabinets.
Best placed in: Garage workshop, basement craft area, outdoor patio or driveway for spray painting projects, spare room used as a DIY studio.
May not suit: Homes without dedicated workspace for painting projects, renters who cannot undertake furniture refinishing, households with very young children who might scatter small plastic pieces.
Buy it if:
- You are refinishing kitchen cabinets and need to paint multiple doors efficiently
- You do regular furniture flipping or upcycling projects and want reusable painting supports
- You work with canvas, epoxy resin, or acrylic pouring and need stable elevation
Consider waiting if:
- You want to read verified customer reviews before committing to a brand-new product with no feedback yet
Skip it if:
- You only have one small project and can get by with improvised supports like cups or scrap wood
- You need supports for extremely delicate surfaces where even minimal contact points might leave marks
Check the latest price and availability on Amazon before it sells out.

Pros
- Generous 36-piece count handles big projects without needing multiple sets
- Supports heavy items up to 200-250 lbs unlike flimsy alternatives
- Solvent-resistant and reusable across different paint types
- Compact nested storage saves space in small workshops or garages
- Locking system adds stability when painting larger pieces
Cons
- Zero customer reviews makes it hard to verify real-world durability claims
- Yellow color may show paint drips and stains over time
- Lightweight plastic construction might tip with very top-heavy items
If you have ever tried to paint cabinet doors flat on a tarp, you know the frustration of wet edges sticking to your surface or having to wait hours between coats. These pyramid stands solve that problem for less than the cost of lunch. You get 36 pieces, which is enough to paint an entire kitchen's worth of doors in one session, and they nest together so they do not clutter your workspace when you are done.
The locking feature is smarter than it sounds. You can connect a few stands together under a wobbly piece of furniture or a warped board, and suddenly you have a stable painting platform instead of a tippy mess. They are also solvent-resistant, so whether you are using latex, oil-based paint, or spray lacquer, these hold up without melting or getting gummy.
If you want a simple way to speed up furniture refinishing or cabinet painting without investing in an expensive drying rack system, this one delivers.
Styles it works with: DIY farmhouse, upcycled vintage, modern minimalist, any style where you are painting or refinishing your own furniture and decor
Best placed in: Garage workbench, basement workshop, covered patio during outdoor painting projects, craft room table
May not suit: Homes without a dedicated painting or project space, renters who are not doing furniture DIY, households where small plastic pieces might be a choking hazard for young children
Buy it if:
- You are repainting kitchen cabinets and need to flip doors without waiting for one side to fully dry
- You refinish thrift store furniture and want to elevate pieces for spray painting
- You do frequent craft or woodworking projects and need reusable supports that store flat
Consider waiting if:
- You want to see verified customer reviews before purchasing since this product has zero reviews so far
Skip it if:
- You only paint once a year and can get by with scrap wood blocks or cardboard
- You need heavy-duty industrial stands rated for commercial workshop use
Check the latest price and availability on Amazon before it sells out.

Pros
- Tool-free design makes it genuinely beginner-friendly
- Cleaning connector saves significant time on post-project cleanup
- Four nozzle options provide versatility for different paint viscosities
- Adjustable straw control reduces paint waste and mess
Cons
- No customer reviews yet to verify real-world performance claims
- Pink color may not appeal to all users
- HVLP sprayers require more paint thinning than airless models
This sprayer takes the intimidation out of furniture refinishing and DIY paint projects. The tool-free assembly means you will be painting within minutes of opening the box, not struggling with instructions. What really sets it apart is the mess-free straw adjustment. Instead of stopping mid-project to tilt or remove a paint-covered container, you just turn a knob to change the angle. Your hands stay clean, and you keep working.
The four nozzle sizes give you real flexibility. Use the 1.0mm for intricate stencil work, the 3.0mm for priming a fence, and everything in between for cabinets and furniture. The built-in dust blower is a thoughtful touch that helps you prep surfaces without switching tools. When you are done, the cleaning connector turns a 15-minute scrubbing session into a 2-minute rinse under the faucet.
If you want to refinish furniture or tackle wall accents without renting equipment or hiring help, this one delivers.
Styles it works with: Modern Farmhouse, Coastal, Scandinavian, DIY Industrial
Best placed in: Garage workbench, basement workshop, utility room storage, outdoor shed
May not suit: Homes without a dedicated project space for paint overspray, renters who cannot paint walls or furniture, households that prefer hiring professionals over DIY
Buy it if:
- You want to refinish thrifted furniture or update old cabinets yourself
- You have multiple small to medium painting projects planned this year
- You are tired of brush strokes and roller texture ruining your DIY finishes
Consider waiting if:
- You need a different color option and can wait for restocks
Skip it if:
- You need to spray thick latex paint without thinning it first
- You are looking for a professional-grade sprayer for daily contractor use
Check the latest price and availability on Amazon before it sells out.

Pros
- Durable brass nozzles resist wear better than plastic alternatives
- No need to thin materials saves time and reduces waste
- Includes both paint and stain nozzles in the box
- HVLP system produces less overspray than airless models
- Simple controls work well for beginners
Cons
- Zero customer reviews makes real-world performance unclear
- Turbine systems have less power than airless for thick coatings
- May require multiple coats on large flat surfaces compared to airless sprayers
This sprayer hits a sweet spot for DIYers who are tired of brush marks on cabinet doors but intimidated by professional airless systems. The brass nozzles are the standout feature here. While budget sprayers use plastic tips that wear out or clog, brass delivers consistently smooth results project after project.
The unthinned spraying capability is surprisingly practical. You can pour paint or stain directly from the can into the cup and start working. No measuring, no mixing, no second-guessing ratios. For furniture refinishing or trim work, this removes a major hassle that trips up first-time sprayer users.
If you want faster, smoother finishes on indoor projects without investing in commercial-grade equipment, this one delivers.
Styles it works with: Modern Farmhouse, Transitional, Craftsman, Contemporary
Best placed in: Garage workshop, basement hobby area, spare room setup as painting station
May not suit: Homes without dedicated workspace for spray painting, apartments with strict VOC regulations, households needing to spray outdoors in windy conditions where HVLP overspray becomes an issue
Buy it if:
- You have multiple furniture pieces or cabinet sets to refinish this year
- You want smoother results than brushing but find airless sprayers too messy or expensive
- You work with both paint and stain regularly and need dedicated nozzles for each
Consider waiting if:
- You want to see verified customer reviews and real-world performance feedback first
- You need to spray exterior surfaces or thick latex house paint regularly
Skip it if:
- You only have one small project and renting makes more financial sense
- You need the power of an airless system for large walls or siding
Check the latest price and availability on Amazon before it sells out.
For a beginner, an HVLP electric sprayer like the Graco EVO Plus (rated 4.4) or the FLIMRER (rated 4.5) is the easiest entry, since neither needs a separate air compressor. The SRQLNTT LVLP gun (rated 5, from a small review base, so treat that number as early) is an air-fed option for anyone who already owns a compressor and wants finer control from its 1.3, 1.7, and 2.0 mm nozzles. The KATA and FDKJEJC pyramid sets (rated 4.7 and 4.6) do the same simple job: 36 small cones that keep wet pieces off the ground.
Frequently Asked Questions
Can you paint over wicker without sanding?
It depends. If the existing finish is sound and clean, a bonding primer lets you skip sanding. If it’s glossy or flaking, a light scuff with 220-grit gives the primer something to grip.
Do I have to remove all the old paint?
No, not unless it’s peeling or already caked into the weave. Sound paint just needs a wash, a light scuff, and a fresh primer coat before you recoat.
Is spray paint or brush better for wicker?
Spray, almost always. A brush leaves the deep weave patchy and beads on the high points, while an atomized coat wraps every strand evenly and won’t crack in the gaps.
How many coats of paint does wicker need?
Usually three thin coats over one primer coat. Light passes prevent the pooling and cracking that a single heavy coat causes in the joints.
Can you paint outdoor resin wicker?
Yes. Use a plastic-bonding primer so the finish keys into the slick surface, then an exterior-rated paint that flexes through temperature swings instead of cracking.
How long should paint cure before use?
Most spray finishes are dry to touch in under an hour but need a full 24 hours to cure hard. Sitting on it early leaves permanent dents in soft paint.
What kind of paint lasts longest on wicker?
For outdoor use, an exterior acrylic or enamel meeting an ASTM weatherability rating. It stays flexible in sun and cold, which is exactly what keeps it from cracking.
Bottom Line
The whole job comes down to two things: prime for adhesion and spray in thin coats. Skip the primer or lay it on thick with a brush, and you’ll be repainting within a year.
Identify your fiber first, wash it, let it dry a full day, then work an atomized coat 8 to 10 inches out across three light passes. If the wicker is crumbling or unraveling at the joints, stop and replace it. Paint won’t fix a frame that’s already failing.







Write Your Review
No reviews yet. Be the first to share your experience!