

> Editorial Note: I’m Erin Schwartz, and I cover home decor with a bias toward what actually works in a real room. The guidance here weighs scale, layout, and materials against Apartment Therapy and Wirecutter coverage rather than styling a space that nobody lives in.
Inside mount blinds look built-in and clean, but they punish a sloppy measurement more than any other window treatment. The blind sits inside the frame, so a width off by a quarter inch either binds against the casing or leaves a light gap you can’t hide. The whole job comes down to measuring the opening at three points and trusting the factory to take the clearance. Before you start, it helps to know how to clean window blinds and how to clean venetian blinds for upkeep, curtain blinds if you plan to layer fabric, and how to measure a tv and how to measure for a sofa use the same measure-the-space discipline.
Is Your Window Deep Enough for an Inside Mount?
Check the frame depth first, because inside mount needs a minimum flat depth to hold the headrail. Most mini and faux-wood blinds want at least 2 inches of unobstructed depth for a flush mount, though some fit in less with a partial recess. Measure from the front edge of the casing straight back to any obstruction like a crank or lock.
If the depth falls short of 2 inches, the headrail sticks out past the frame or won’t clear window hardware. In that case switch to an outside mount rather than forcing it. Note any handles, cranks, or alarm sensors inside the recess too, since they steal usable depth. Confirm the depth before you measure anything else, because it decides whether inside mount is even possible.
How Do You Measure the Width for Inside Mount?
Measure the width at three heights, top, middle, and bottom of the opening, and report the narrowest number. Windows drift out of square over time, so the smallest width guarantees the blind clears the frame at every point. Read each measurement to the nearest eighth of an inch and hold the tape level against the inside faces of the casing.
Do not subtract anything from your width. The factory automatically deducts about a quarter to a half inch for clearance, so if you deduct too, the blind ends up too narrow and light leaks down both sides. This is the single most common inside-mount error. Report the exact opening and let the manufacturer handle the tolerance for a snug fit.
How Do You Measure the Height for Inside Mount?
Measure the height at three points, left, center, and right, from the top inside of the frame to the sill. For inside mount you generally report the longest of the three so the blind reaches the sill fully. A metal tape held straight and taut gives a cleaner reading than a cloth one that can sag mid-drop.
If there’s no sill, measure to the point where you want the blind to end. Some people prefer the exact height with no deduction and let the blind rest on the sill; others deduct a small amount to keep the bottom rail from dragging. Check the manufacturer’s guidance, since a few take the height deduction for you the way they do width. Record all three readings so you can see how far out of square the frame runs.
What Mistakes Ruin an Inside Mount Fit?
The biggest mistake is subtracting for clearance when the factory already does it. Deduct half an inch yourself on top of the factory’s cut and the blind arrives too narrow, with a visible gap of light on each side that defeats the built-in look. Report the raw opening every time.
The second is measuring only once and missing an out-of-square frame. A window that’s a quarter inch wider at the bottom than the top will bind a blind cut to the top reading, so the three-point check is non-negotiable. The third is ignoring depth-robbing hardware: a window lock or crank inside the recess can block the headrail even when the raw depth measures 2 inches. Account for those before you order.
What You’ll Need
The tools below are ranked by owner rating, and for inside mount work you want a rigid tape that holds level across a window opening. A 25-foot retractable handles any window with room to spare, and a fraction-marked blade makes reading to the eighth easier. Start with #1 for a wall-mountable adhesive stick tape.

Pros
- Strong permanent adhesive works on wood, metal, and laminate surfaces
- Durable steel construction with protective coating stands up to workshop use
- Can be trimmed to exact size needed for custom workspaces
- Eliminates fumbling with handheld tape measures during cuts
- Clear, easy-to-read graduations in standard imperial measurements
Cons
- Permanent adhesive means you cannot easily reposition once applied
- Only available in 6-foot length which may be too short for larger work surfaces
- Right-to-left orientation requires adjustment if you typically read left to right
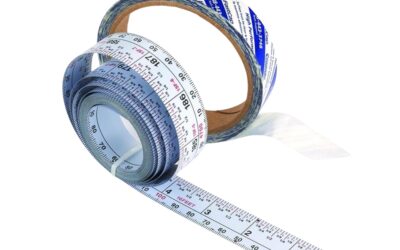
If you have a workshop, craft room, or dedicated project space, this adhesive tape measure changes how you work. Instead of constantly picking up and setting down a tape measure, you get instant reference measurements right on your table surface. It stays put while you slide materials across it, mark cuts, or line up assembly work.
The steel construction means it will not stretch or warp like cheaper alternatives, and the polyurethane coating protects it from scratches, sawdust, and general workshop wear. You can cut it to fit your exact table width, which is perfect for smaller workbenches or craft tables where a full 6 feet is too much.
If you want permanent measuring reference built into your workspace without constantly reaching for a tape measure, this one delivers.
Styles it works with: Industrial workshop spaces, modern craft rooms, functional home offices, maker spaces
Best placed in: Workshop benches, craft tables, sewing tables, garage workstations, drafting tables, DIY assembly areas
May not suit: Homes without dedicated workshop or craft space, renters who cannot make permanent modifications to furniture, or anyone who needs measurements longer than 6 feet on a single surface
Buy it if:
- You do regular woodworking, sewing, or craft projects that require repeated measurements
- You have a dedicated workbench or table that will not be moved or repurposed
- You are tired of your tape measure sliding around or getting buried under materials mid-project
Consider waiting if:
- You need a measuring solution you can easily remove or reposition later
Skip it if:
- Your work surface is longer than 6 feet and you need continuous measurement
- You work on temporary or portable surfaces that change locations frequently
Check the latest price and availability on Amazon before it sells out.

CRAFTSMAN 25-Ft Tape Measure - Manual Lock, Fraction Markings, 13ft Reach, Compact Grip Design for DIY & Pro Use
Pros
- Extended 13-foot reach reduces need for assistance on solo projects
- Alternating color-coded fractions improve measurement speed and accuracy
- Durable rubber grip provides comfort and drop protection
- Compact form factor stores easily in any tool belt or pocket
- Strong value for the feature set at this price point
Cons
- Only 2,544 reviews suggest it's newer to market compared to established competitors
- Manual lock may be slower to operate than auto-lock designs for frequent use
- Blade width of 3.5 inches is narrower than some pro-grade options
This CRAFTSMAN tape measure solves one of the most annoying parts of DIY projects: trying to hold one end of the tape while walking to the other side of the room. The 13-foot standout means the blade stays rigid enough to measure across most rooms without collapsing or needing a second person to help. For hanging curtains, measuring furniture spacing, or checking door frames, that solo capability is a genuine time-saver.
The color-coded fraction markings are smarter than they sound. Instead of squinting at tiny black lines that all look the same, you get alternating colors and heights that make 1/4, 1/2, and 3/4 inch marks instantly recognizable. If you have done any measuring in dim light or at awkward angles, you will appreciate how much faster this makes the job. The rubber overmold is thick enough to survive drops onto concrete without cracking, and it fits comfortably in your hand during long measuring sessions.
If you want a tape measure that works well for solo projects without paying $30+ for a premium brand, this one delivers.
Styles it works with: Modern Farmhouse, Industrial, Traditional, Minimalist
Best placed in: Tool drawer in kitchen or garage, hung on pegboard in workshop, stored in entryway catch-all basket for quick home repairs
May not suit: Households looking for a decorative tool display piece, professional contractors who need heavy-duty 30+ foot tapes with advanced features
Buy it if:
- You frequently measure spaces alone and need reliable blade standout
- You struggle to read standard tape measure markings quickly and accurately
- You want a dependable tape for home DIY without spending premium tool prices
- You need a compact tape that won't weigh down your tool belt
Consider waiting if:
- You prefer auto-lock mechanisms and can wait for a sale on higher-end models
Skip it if:
- You need 30+ foot reach for large-scale construction or commercial work
- You require metric-only measurements rather than imperial fractions
Check the latest price and availability on Amazon before it sells out.
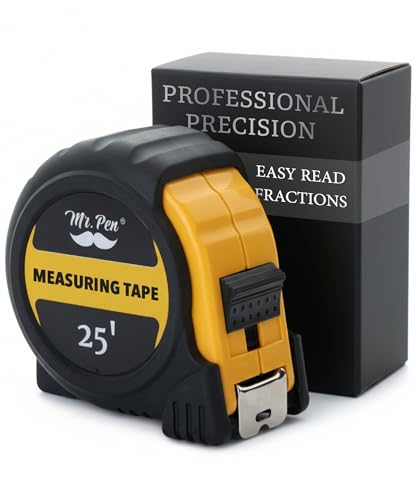
Pros
- Durable rubberized exterior withstands workshop drops and outdoor use
- Both metric and imperial scales work for international furniture instructions and US home projects
- Belt clip and compact size make it easy to carry without bulk
- Thumb lock mechanism holds measurements steady for accurate marking
Cons
- No customer reviews yet to verify long-term blade retraction quality
- Basic feature set lacks standout upgrades like magnetic tips or fractional markings
- Yellow color may show dirt faster than darker tape measures
This is the tape measure that lives on your tool belt and actually stays there. The rubberized casing means it survives the inevitable drops off ladders, countertops, and truck beds without cracking. The 25-foot blade handles most home projects in one pull, from measuring a gallery wall to checking if that sofa will fit through the doorway.
What makes it genuinely useful for home decor work is the dual measurement system. When you are assembling flat-pack furniture with metric instructions but buying lumber in inches, you don't need to pull out your phone for conversions. The thumb lock is smooth enough to use one-handed when you are holding a level or picture frame in the other.
If you want a reliable measuring tool that works for weekend DIY and room makeovers without babying it, this one delivers.
Styles it works with: Modern Farmhouse, Industrial, Minimalist, Scandinavian
Best placed in: Workshop pegboard, kitchen junk drawer, garage tool wall, craft room organizer
May not suit: Homes where bright yellow clashes with carefully curated neutral tool aesthetics, or buyers who prefer compact keychain-style tape measures for quick furniture checks
Buy it if:
- You are setting up a first toolbox and need a dependable tape measure under $10
- You regularly switch between metric furniture instructions and imperial hardware store runs
- You need a tape that can take jobsite abuse without constant replacements
Consider waiting if:
- You want to see verified customer reviews before committing, since this product currently has none
Skip it if:
- You need specialty features like magnetic tips for metalwork or fractional inch markings for fine woodworking
- You prefer compact pocket tape measures and rarely need measurements beyond 16 feet
Check the latest price and availability on Amazon before it sells out.

Pros
- Precision steel construction resists warping and maintains accuracy over time
- Large, clear markings are easy to read at a glance during fast-paced projects
- Compact 78-inch length fits most standard workbenches and saw fences
- Strong adhesive backing stays secure on varied surfaces without peeling
- Affordable price point makes it easy to outfit multiple work surfaces
Cons
- Zero customer reviews make it difficult to verify real-world durability
- 0.5-inch width may be too narrow for some users to read comfortably from a distance
- Once applied, repositioning may damage the adhesive backing
If you've ever fumbled with a tape measure while trying to mark a cut line, this adhesive measuring tape solves that frustration in one peel-and-stick motion. It turns any flat surface into a built-in ruler, so you can slide your workpiece along the edge and mark measurements without stopping to reposition a handheld tape. The dual-scale markings mean you won't need to pause and convert units when following plans that mix imperial and metric.
The high-contrast yellow backing isn't just for looks. In a dimly lit garage or basement workshop, those bold black numbers pop, so you're not squinting or second-guessing your measurements mid-project. The waterproof steel construction also means you can wipe down your workbench without worrying about smudging or fading the markings over time.
If you want a permanent measurement guide on your saw fence or sewing table without drilling holes or installing brackets, this tape delivers.
Styles it works with: Industrial, Modern Workshop, Craftsman, Utilitarian
Best placed in: Home workshop workbenches, garage saw fences, craft room sewing tables, basement project areas
May not suit: Finished living spaces where visible measurement markings would clash with decor; curved or heavily textured surfaces where adhesive won't bond properly
Buy it if:
- You make repetitive cuts on a table saw or miter saw and want to eliminate tape measure fumbling
- You're setting up a new workbench or sewing station and need a measurement reference that won't shift
- You work in both imperial and metric and want one scale that shows both without mental math
Consider waiting if:
- You want to see verified customer reviews before committing to a brand-new product with zero feedback
Skip it if:
- You need a flexible tape measure for curved surfaces or measuring around objects
- Your workspace is longer than 78 inches and you'd need to piece together multiple strips
Check the latest price and availability on Amazon before it sells out.
The Starrett 72-inch adhesive Stix tape leads at 4.7 and mounts flat, useful for a fixed reference along a frame. The CRAFTSMAN 25-foot tape, also 4.7, adds fraction markings that make eighth-inch reads faster, and the Mr. Pen 25-foot easy-read tape matches that 4.7 with a high-contrast blade. The FRCTLNKG adhesive measuring tape sits at 4.6 for stick-on reference use, and the TMWEFUSC two-pack of 25-foot dual-scale tapes rounds it out at 4.2, the honest low here, giving you a metric-and-imperial backup.
Frequently Asked Questions
Do I subtract for clearance on inside mount blinds?
No. The factory deducts about a quarter to a half inch automatically. Report the exact opening width. Subtracting yourself leaves the blind too narrow with light gaps on both sides.
How much depth do inside mount blinds need?
At least 2 inches of flat, unobstructed depth for a flush headrail on most blinds. Less than that, and the headrail protrudes or hits window hardware, so switch to an outside mount.
Why do I measure the window at three points?
Because frames rarely stay perfectly square. Measuring width at top, middle, and bottom and using the narrowest ensures the blind clears the frame everywhere instead of binding at the tight spot.
Do I use the narrowest or widest width measurement?
The narrowest. For height, generally the longest. Narrowest width guarantees clearance side to side, and the longest height reaches the sill for full coverage on an inside mount.
What if a window crank or lock is inside the frame?
It steals usable depth. Measure to the obstruction, not the back of the casing. If hardware blocks the 2-inch minimum, choose an outside mount so the blind clears it entirely.
Can I do an inside mount on an out-of-square window?
Yes, but it shows the gap. If the frame is off by more than about a quarter inch, an outside mount hides the crookedness better while an inside mount highlights it.
Width or height first when I order?
Width first, then height, almost universally. A blind listed 30 by 48 means 30 inches wide by 48 tall. Reversing the two orders a blind for the wrong orientation.
Bottom Line
Inside mount blinds fit cleanly when you confirm 2 inches of depth, measure the opening at three points, and report the exact numbers without deducting for clearance. Use the narrowest width and the longest height, and account for any crank or lock that eats into the recess. The factory takes the tolerance, so your job is an accurate raw measurement, not a corrected one. Measure twice at three points each, and the blind drops into the frame with no binding and no light gap.




Write Your Review
No reviews yet. Be the first to share your experience!