

> Editorial Note: I’m Liam Wright, an outdoor and garden editor. I grew up in my family’s landscaping business and now cover what actually survives a season of UV, rain, and freeze-thaw cycles. The picks here are evaluated against ASTM weatherability standards and manufacturer durability ratings.
The biggest mistake I see? People level the ground dead flat. A patio that’s perfectly flat traps water, and standing water is what heaves pavers, cracks slabs, and turns a weekend project into a redo two winters later. You actually want a slight slope away from the house so rain runs off on its own. Get the base right and everything you set on top stays put, whether that’s a best gas fire pit table, a best wood burning fire pit, a full best outdoor sofa setup, a shaded corner under a best patio umbrella, or a best raised garden bed along the edge. Here’s the sequence that holds up.
The Ground Rules Before You Start
Three non-negotiables before a single shovel goes in. First, slope: plan for a 1/4-inch drop per foot away from your house, so a 12-foot patio drops about 3 inches end to end. Second, depth: dig deep enough for 4 inches of compacted gravel base plus your paver or sand layer, usually 6 to 8 inches total. Third, call 811 before you dig — hitting a gas or utility line is a life-or-death shortcut, not a small one. Skip any of these and you’re rebuilding, not relaxing.
Step 1: Mark the Layout and Set Your Slope
Start by outlining the patio with stakes and mason’s string. Drive a stake at each corner, then run string between them at the height you want the finished surface to sit. This string is your reference for everything that follows, so pull it tight enough that it doesn’t sag.
Now build in the slope. Tie a line level to the string and level it first, then lower the downhill end by 1/4 inch for every foot of run. On a 10-foot patio, that’s a 2.5-inch drop from the high side to the low side. Mark that offset on the downhill stakes so you can’t lose track of it.
Why this matters: water follows gravity, and a 1/4-inch-per-foot pitch is the ASTM-referenced minimum most hardscape crews use to move runoff without the surface feeling tilted underfoot. Any flatter and puddles form. Any steeper and your patio furniture feels like it’s sliding toward the yard.
Double-check the slope runs away from the house, never toward the foundation. Snap a photo of the string layout before you dig. You’ll thank yourself in Step 3.
Step 2: Strip the Sod and Excavate
With the layout marked, cut and remove the sod inside your string lines. A flat spade works, but for anything over 100 square feet, rent a sod cutter; it’ll save your back and give a cleaner edge. Set the sod aside so you can patch bare spots in the lawn with it later.
Then dig. Excavate to a depth that fits your full build: 4 inches of gravel base, 1 inch of bedding sand, plus the thickness of your pavers. For standard 2-inch concrete pavers, that’s about 7 inches of total excavation below your finished-surface string.
Keep the bottom of the hole following the same slope you set up top. This is the step people rush, and it shows later. Dig it flat and your gravel layer ends up uneven, which telegraphs straight up through the finished surface.
Check the depth as you go with a story pole — a scrap 2×4 marked at your target depth. Consistent depth here is what makes the base layer behave in the next step.
Step 3: Lay and Compact the Gravel Base
The gravel base is the part of the patio that actually carries weight, so this is the step that makes or breaks the whole project. Use crushed stone with angular edges — a 3/4-inch minus, which packs into a locked matrix rather than shifting like round pea gravel.
Add it in thin layers, called lifts. Spread 2 inches, then run a plate compactor over it two or three passes. Add another 2 inches and compact again. Compacting in 2-inch lifts is the detail that matters; dump all 4 inches at once and the bottom never fully densifies, a principle codified in ASTM D698 compaction guidance.
Mist each lift lightly with a hose before compacting. Slightly damp stone packs tighter than bone-dry stone. Keep checking your slope with the string line as you build, since the compacted base should mirror that same 1/4-inch-per-foot pitch.
A properly compacted base won’t leave footprints when you walk on it. If your boot sinks in, keep compacting. Firm enough to build on. That’s the goal here.
Step 4: Screed a Level Sand Bed
Now for the layer that fine-tunes your level: a 1-inch bedding sand course over the compacted gravel. This is where coarse, sharp sand earns its keep, since it stays put under load better than fine play sand.
Lay two lengths of 1-inch outer-diameter PVC pipe on the gravel, parallel, spaced a few feet apart. Pour sand between them, then drag a straight 2×4 across the pipes like a squeegee. This screeding leaves a uniform 1-inch bed at the exact slope your pipes are resting on. Pull the pipes and fill the grooves with a trowel.
Don’t walk on the screeded sand. One footprint and you’ve got a low spot that’ll show in the finished surface. Set your pavers directly onto the bed, working from one corner outward, tapping each down with a rubber mallet and checking with a level as you go.
Once the pavers are down, the final lock comes from what you sweep into the joints. That’s where the products below come in.
The Right Products Make It Easier
Two things decide whether a leveled patio stays level: the bedding sand under the pavers and the joint sand locking them together. All three picks below are graded for outdoor durability against ASTM weatherability benchmarks and carry owner ratings at or above 4.0. Start with the base sand if you’re still building the bed in Step 4; reach for a polymeric joint sand once the pavers are set and you need them to stop shifting.


Pros
- Ceramic Flex technology allows joints to flex under temperature changes without cracking or crumbling
- Cement-free formula sweeps in quickly and activates cleanly, making it accessible for confident DIYers
- Works on joints from 1/8" to 4" wide, covering a wide range of paver sizes and styles
- Dust-free formulation keeps the work area cleaner and reduces respiratory irritation during application
Cons
- Color can appear noticeably darker after water activation than it looks dry, so testing on a small area first is essential
- Application requires precise watering technique and dry pavers -- overwatering or applying on damp surfaces causes white haze that takes weeks to resolve
- A 10 lb bag covers only about 9 sq ft, so larger patio projects require purchasing multiple bags and planning coverage carefully
If you have ever looked at your patio and noticed weeds threading up between the pavers or joints crumbling after a hard winter, DOMINATOR Polymeric Sand solves that problem at the root. The Ceramic Flex technology is genuinely different from standard polymeric sand -- it bonds the joint material while still allowing slight movement, which means it does not fracture when temperatures swing between seasons.
The camel brown color is well-chosen for outdoor spaces. It reads as a warm neutral that complements both light concrete pavers and darker natural stone without looking artificial. Once it cures, the finished surface looks intentional and polished, the kind of detail that elevates a backyard from functional to well-designed.
The install process is straightforward enough for a motivated homeowner on a weekend afternoon. The dust-free formula and Easy Pour Handle are small touches that make a real difference when you are working on your knees for a few hours. If you want stable, professional-looking paver joints without paying for a landscaping crew, this one delivers.
Styles it works with: Traditional, Modern Farmhouse, Mediterranean, Craftsman
Best placed in: Backyard patio installations, front walkway or pathway pavers, driveway border stones, pool deck surrounds
May not suit: Indoor tile applications or grouted surfaces where mortar is required -- this product is not a grout or mortar replacement. Also not suitable for projects in climates where temperatures will drop below 50 degrees F within 48 hours of application, which limits fall and early spring installs in northern regions.
Buy it if:
- You are installing or refreshing a patio, walkway, or driveway with paver joints between 1/8" and 4" wide and want a long-lasting hold
- You have dealt with weed growth or ant tunneling between pavers and want a stabilizer that actually seals the gaps
- You live in a region with freeze-thaw winters and need a joint filler that flexes rather than cracks under temperature changes
Consider waiting if:
- You are in late fall or early spring and temperatures in your area may dip below 50 degrees F within two days of when you plan to apply
Skip it if:
- Your project involves indoor tile, standard grout joints, or any surface requiring mortar -- this product is not designed for those applications
- Your pavers are currently wet or recently rained on and you cannot wait for them to fully dry before starting
Check the latest price and availability on Amazon before it sells out.
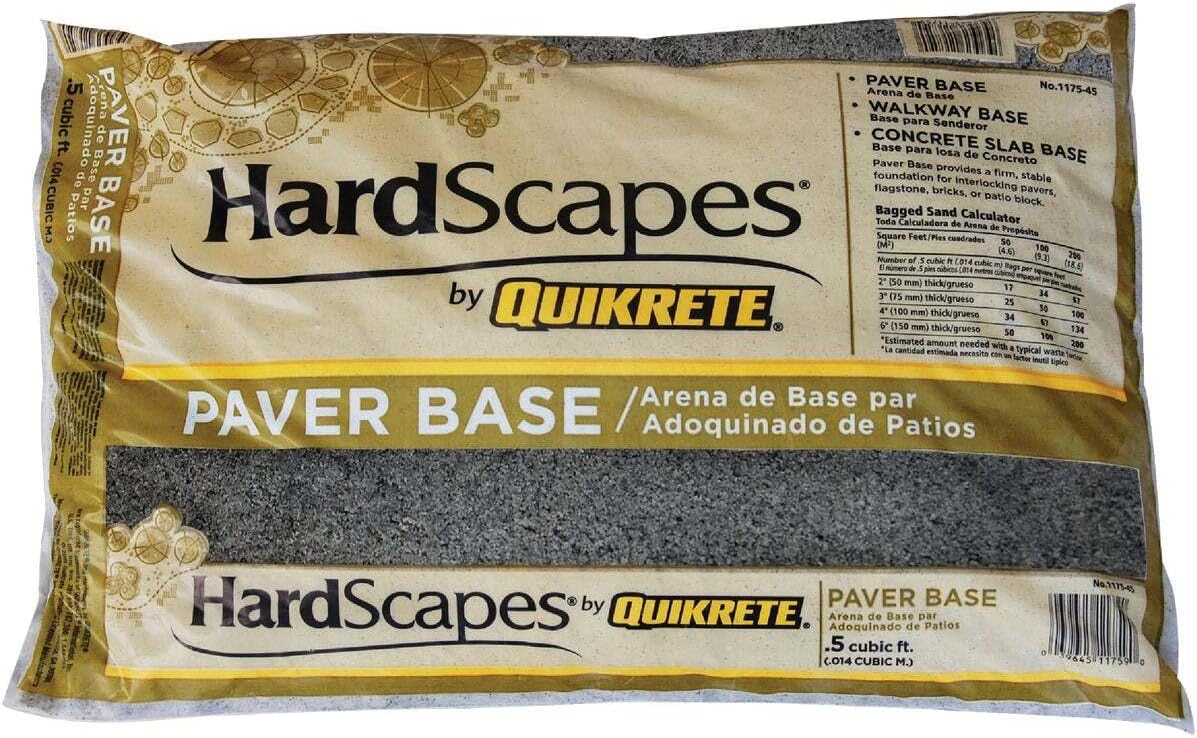
Quikrete HardScapes 0.5 Cu Ft Paver Base Sand for Patios, Walkways and Outdoor Landscaping Projects
Pros
- Trusted Quikrete brand known for consistent quality in concrete and masonry products
- Compact 0.5 cu ft size is easy to transport and handle for small to mid-size jobs
- Designed specifically for paver applications, not a generic all-purpose sand
Cons
- Small bag size means multiple bags are needed for any project larger than a few square feet, driving up cost quickly
- Limited customer review data makes it harder to gauge long-term performance in different climates
- At $28.79 per half cubic foot, the price per unit is high compared to bulk alternatives at local building supply stores
If you have been dreaming of a clean patio or a charming garden walkway, the foundation beneath your pavers matters just as much as the pavers themselves. Quikrete HardScapes Paver Base Sand gives you the compactable, well-graded base layer that keeps everything level, locked in place, and looking sharp season after season.
What makes this product genuinely useful for the home decorator is convenience. You do not need to source sand from a landscaping yard or figure out the right grade for your application. This bag is purpose-built for paver work, which removes guesswork from your project and gets you closer to that finished outdoor space faster.
If you want a stable, professional-grade paver base without sourcing bulk materials or making multiple trips to a landscape supply yard, this one delivers.
Styles it works with: Modern Farmhouse, Cottage Garden, Mediterranean Outdoor, Minimalist Landscape
Best placed in: backyard patio installations, front walkway and path projects, side yard stepping stone layouts
May not suit: Large-scale hardscape projects where bulk sand is significantly more cost-effective, or renters and apartment dwellers with no outdoor ground access
Buy it if:
- You are completing a small DIY patio or walkway project and want a ready-to-use paver base without a trip to a bulk landscape supplier
- You need a quick top-up of base material to level a sunken or shifted paver section
- You want the reliability of the Quikrete brand for a weekend hardscape project with no room for material guesswork
Consider waiting if:
- You are planning a larger patio or path where buying multiple bags becomes far more expensive than sourcing bulk sand locally
Skip it if:
- You have a landscape supply yard nearby where you can get the same material in bulk at a fraction of the per-cubic-foot cost
- Your project requires more than a few cubic feet of base material, making this bag size impractical
Check the latest price and availability on Amazon before it sells out.

Rhino Power Bond Plus Polymeric Sand for Pavers - Slate Gray, 10 lb Bag for Joints Up to 2 Inches
Pros
- Handles wide joints up to 2 inches, which many competing polymeric sands do not support
- Weather-resistant formula performs in rain, snow, and direct sun without crumbling or washing away
- Versatile enough for driveways, walkways, and pool deck applications in one product
Cons
- At 10 pounds, the bag size may require multiple purchases for larger patio or driveway projects, increasing cost per square foot
- Application requires precise moisture activation, and over- or under-watering can affect how well the sand hardens
- Slate gray is the only color variant noted, which may not complement all paver colors or design aesthetics
Getting the spaces between your pavers right is one of those finishing details that separates a polished outdoor space from one that looks unfinished after the first hard rain. Rhino Power Bond Plus fills those joints with a sand that actually hardens in place, meaning you are not re-sweeping and re-filling every season. For anyone who has watched plain sand wash out of a new patio after a single storm, this product solves a genuinely frustrating problem.
What stands out here is the flexibility for real-world projects. Wide, irregular joints up to 2 inches are supported, which matters if your pavers were not set perfectly uniform or if you are working with natural stone that has organic spacing. The slate gray color is neutral enough to work with most gray, charcoal, tan, and even lighter pavers without looking mismatched.
If you want durable, weed-resistant paver joints without having to hire a landscaping crew or re-do the work every year, this one delivers.
Styles it works with: Modern Farmhouse, Contemporary Outdoor, Traditional Hardscape, Mediterranean Courtyard
Best placed in: Backyard patio with concrete pavers, front walkway or driveway apron, pool deck surrounds with wet cast stone
May not suit: Indoor tile or flagstone applications where polymeric sand is not appropriate, or decorative gravel paths where hardening the joint would look unnatural
Buy it if:
- You are finishing or repairing a paver patio, driveway, or walkway and want joints that stay put through rain and freezing temperatures
- Your paver joints are on the wider side, up to 2 inches, and standard polymeric sands have not filled them properly
- You want a low-maintenance outdoor surface that resists weed growth and ant intrusion without repeated re-sanding
Consider waiting if:
- You need a color other than slate gray to match a specific paver palette, as options appear limited in this product line
Skip it if:
- Your project covers a large area and the cost of multiple 10-pound bags would push you toward a bulk contractor-grade product
- You are working with natural sand or gravel paths where a hardening joint compound would be inappropriate
Check the latest price and availability on Amazon before it sells out.
DOMINATOR Camel Brown Polymeric Sand (DOMINATOR): Locks the Joints So Your Level Holds
The hardest part of leveling isn’t the initial screed; it’s keeping the surface flat after months of rain and foot traffic. That’s the job this polymeric sand does. You sweep the Camel Brown sand into the paver joints after Step 4, mist it, and its Ceramic Flex binder hardens into a flexible lock that resists washout and weed growth. At a 4.2 rating it’s the highest-scored pick here, and owners consistently note the joints stay put through freeze-thaw cycles without cracking out. The warm camel tone reads well with tan and buff pavers. If your joints sit under 1 inch wide, this is the one I’d sweep in first.
Quikrete HardScapes Paver Base Sand (Quikrete): The Bedding Layer From Step 4
This is the sand you screed in Step 4, sold in a manageable 0.5-cubic-foot bag. Quikrete’s HardScapes base sand is washed and properly graded, so it beds pavers evenly and drains well, and water moving down your slope doesn’t stall under the surface. At a 4.1 rating, owners like that it spreads clean and screeds smooth without big pebbles fouling the straightedge. One 0.5-cubic-foot bag covers roughly 3 square feet at a 1-inch depth, so buy by the pallet for anything larger than a landing. Use this to build the bed; save the polymeric picks for the joints once pavers are set.

Rhino Power Bond Plus Polymeric Sand (RhinoPolymericSand): For Wide Joints Up to 2 Inches
Flagstone and irregular stone leave gaps a standard joint sand can’t fill. Rhino Power Bond Plus is rated for joints up to 2 inches, which is why it’s my pick if you’re setting natural stone instead of tight-gap pavers. You sweep the Slate Gray sand in after Step 4, mist per the label, and it cures into a firm bond that keeps wide joints from washing out in heavy rain. At a 4.0 rating it’s the lowest-scored of the three, and a few owners note you have to follow the watering steps closely or it hazes. Get the activation right and it holds well. The gray tone suits bluestone and slate.
Frequently Asked Questions
What if my yard already has a big slope?
It depends on how steep. A drop under 1 foot across the patio width can be handled by cutting into the high side and building up the low side with compacted gravel. Anything steeper and you’re into retaining-wall territory, which needs proper drainage behind the wall and often a permit. For a grade change over 2 feet, get a pro to look at it before you dig.
What if my ground is soft or stays wet?
No, you shouldn’t build directly on it. Soft, wet soil won’t support a base and will pump and sink under load. Excavate deeper — 6 inches of compacted gravel instead of 4 — and add a woven geotextile fabric between soil and gravel to stop the two from mixing. If water pools constantly, run a perforated drain pipe under the base to carry it off.
What if I don’t own a plate compactor?
Yes, you can rent one, and you should. A hand tamper works for a small landing under 25 square feet, but for anything larger, a gas plate compactor from a rental yard runs about $60 to $80 a day and does in an hour what takes all afternoon by hand. Wirecutter’s outdoor-project guides make the same call: rent the compactor.
What if my patio sits right against the house?
Yes, you can build it there, but always slope the surface away from the foundation, never toward it. Set the high edge at the house and pitch it out at 1/4 inch per foot so runoff moves toward the yard. Keep the finished surface at least 2 inches below any door threshold and below the siding, so rain and snowmelt can’t wick into the wall.
What if the ground freezes hard where I live?
It depends on your frost depth, but the base matters more than the surface material. A well-compacted 4-to-6-inch gravel base drains water out before it can freeze, which is what limits frost heave. Polymeric joint sand graded to ASTM weatherability standards flexes with seasonal movement instead of cracking. In deep-frost regions, don’t skimp on base depth.
Bottom Line
Level doesn’t mean flat. The patios that survive a decade are the ones pitched 1/4 inch per foot over a compacted 4-inch gravel base, with the sand bed screeded clean and the joints locked tight. Nail the base in Step 3 and the rest is finish work. Sweep DOMINATOR polymeric sand into standard joints, or go with Rhino Power Bond Plus if you’re setting wide-gap stone. One honest caveat: if your soil stays wet no matter what, fix drainage first. No amount of gravel out-levels a swamp.


Write Your Review
No reviews yet. Be the first to share your experience!