

> Editorial Note: I’m Olivia Bennett, a storage and organization contributor. I approach storage as a systems problem rather than a product one, fit to actual room dimensions, load ratings, and how the system holds up under daily use.
The biggest mistake people make is bundling every cable together before they know which ones move and which ones stay put. Zip-tie the whole mess into one fat rope and you’ll be cutting it apart every time you swap a monitor or charge a headset. Cable organization is a systems problem, same as a best closet organizer system or a best closet rod. It works when each part has a fixed home and a clear path. The same logic that keeps a best floating shelves for living room display from sagging or a best hanging closet organizer from tangling applies here: separate by function, mount to a surface, leave slack where you need it. Think of the space behind your desk the way you’d think about a best shoe rack: one place for everything, and everything reachable.
The Ground Rules Before You Start
Three non-negotiables before you touch a single cord. First, unplug everything and lay it flat so you can see actual lengths, because you can’t route what you can’t measure. Second, leave at least 6 inches of slack at every device connection so you can pull a monitor forward without yanking a plug. Third, keep power cables and data cables (USB, HDMI, Ethernet) on separate runs, ideally 2 inches apart, to cut down on signal interference. Measure the gap between your desktop underside and the floor too. Most desks give you 24 to 29 inches of drop, and that number decides whether a tray or a floor channel fits.
Step 1: Map and Sort Every Cable First
Start with an inventory, not a tool. Pull each cable, trace it end to end, and sort into two piles: permanent runs (monitor power, desktop tower, docking station) and swap cables (phone charger, laptop, headset). Permanent runs get bundled tight. Swap cables stay loose and accessible. That’s the whole distinction.
Label both ends of every permanent cable before it disappears behind furniture. A strip of masking tape and a pen works, but reusable Velcro tags hold up better over a 3-to-5-year desk setup. Write the device name, not the port type. “Left monitor” beats “HDMI” when you’re troubleshooting a blank screen at 11 p.m.
Count your outlets while you’re here. A standard surge strip gives you 6 to 8 sockets, and most three-monitor workstations burn through 5 before you add peripherals. If you’re short, size up now. Retrofitting a bigger power strip after everything’s mounted means undoing the entire run. Measure twice. Buy once.
Step 2: Mount a Power Strip Off the Floor
A power strip on the floor is a dust magnet and a trip hazard. Get it airborne. Mounting the strip to the underside of the desk or the back of a leg keeps it dry, visible, and off the vacuum’s path. Most strips have keyhole slots on the back, so two screws or two strips of heavy-duty mounting tape rated for 5 pounds or more will hold a loaded 8-outlet strip.
Position the strip so its cord reaches the wall outlet with 4 to 6 inches of slack, no more. Excess cord coiled behind a desk is where tangles start. Mount it switch-side out so you can kill power without crawling under the desk.
Keep the strip horizontal along the back rail rather than vertical down a leg. Horizontal mounting lets plugs hang straight down by gravity, which reduces strain on the socket and keeps chunky wall-wart adapters from popping loose. Give bulky transformers their own end of the strip so they don’t block neighboring sockets. One loaded strip, mounted right, replaces the floor nest entirely.
Step 3: Route the Bundle Through a Tray or Channel
Now corral the permanent runs. A under-desk cable tray is the cleanest fix, since it catches the horizontal run before cables drop to the floor and hides the whole bundle along the back edge. Trays typically span 15 to 30 inches and sit 3 to 4 inches below the desktop, so confirm your legroom clearance before you mount one.
Feed permanent cables into the tray first, then let swap cables rest on top where you can grab them. Don’t cram the tray past 70 percent full. A packed tray traps heat, and power adapters already run warm. ASTM flammability standards exist for a reason around bundled electrical loads, so give the bundle room to breathe.
For the vertical drop from desk to floor, run cables inside a fabric sleeve or a spiral wrap. This is where you finally bundle, but only the permanent runs. Keep the wrap loose enough to slide a new cable in later without unthreading everything. Route the sleeve down a single desk leg and anchor it every 12 inches so it doesn’t sway. One clean vertical line reads as intentional. Six loose cords read as chaos.
Step 4: Anchor Loose Ends and Leave Access
The last step is the one people skip, and it’s why organized setups fall apart in a month. Anchor every cable that ends at a reachable spot (phone charger, headset hook, laptop cable) with an adhesive clip so the cord doesn’t slide back into the void when you unplug it. Mount clips at the desk edge, roughly 2 inches from where you actually reach, not tucked underneath.
Leave a service loop of 6 to 8 inches on anything you’ll unplug weekly. Slack isn’t messy if it’s contained. Coil the extra length once and secure it with a Velcro strap, never a zip tie you’d have to cut.
Do a pull check before you call it done. Tug each cable gently from the device side. Nothing should move at the anchor point, and nothing should pull a plug loose. If a cable shifts, add a second clip. This is a system, and systems earn their keep by holding up to daily use. Reachable. Labeled. Fixed in place.
The Right Products Make It Easier
All three picks below clear a 4.5 owner rating and solve a different part of the run: the horizontal catch, the bundling, and the no-tool mount. Start with the tray if your cables currently pool on the floor. Grab the full kit if you’re wiring a setup from scratch and need clips, sleeves, and ties in one box.
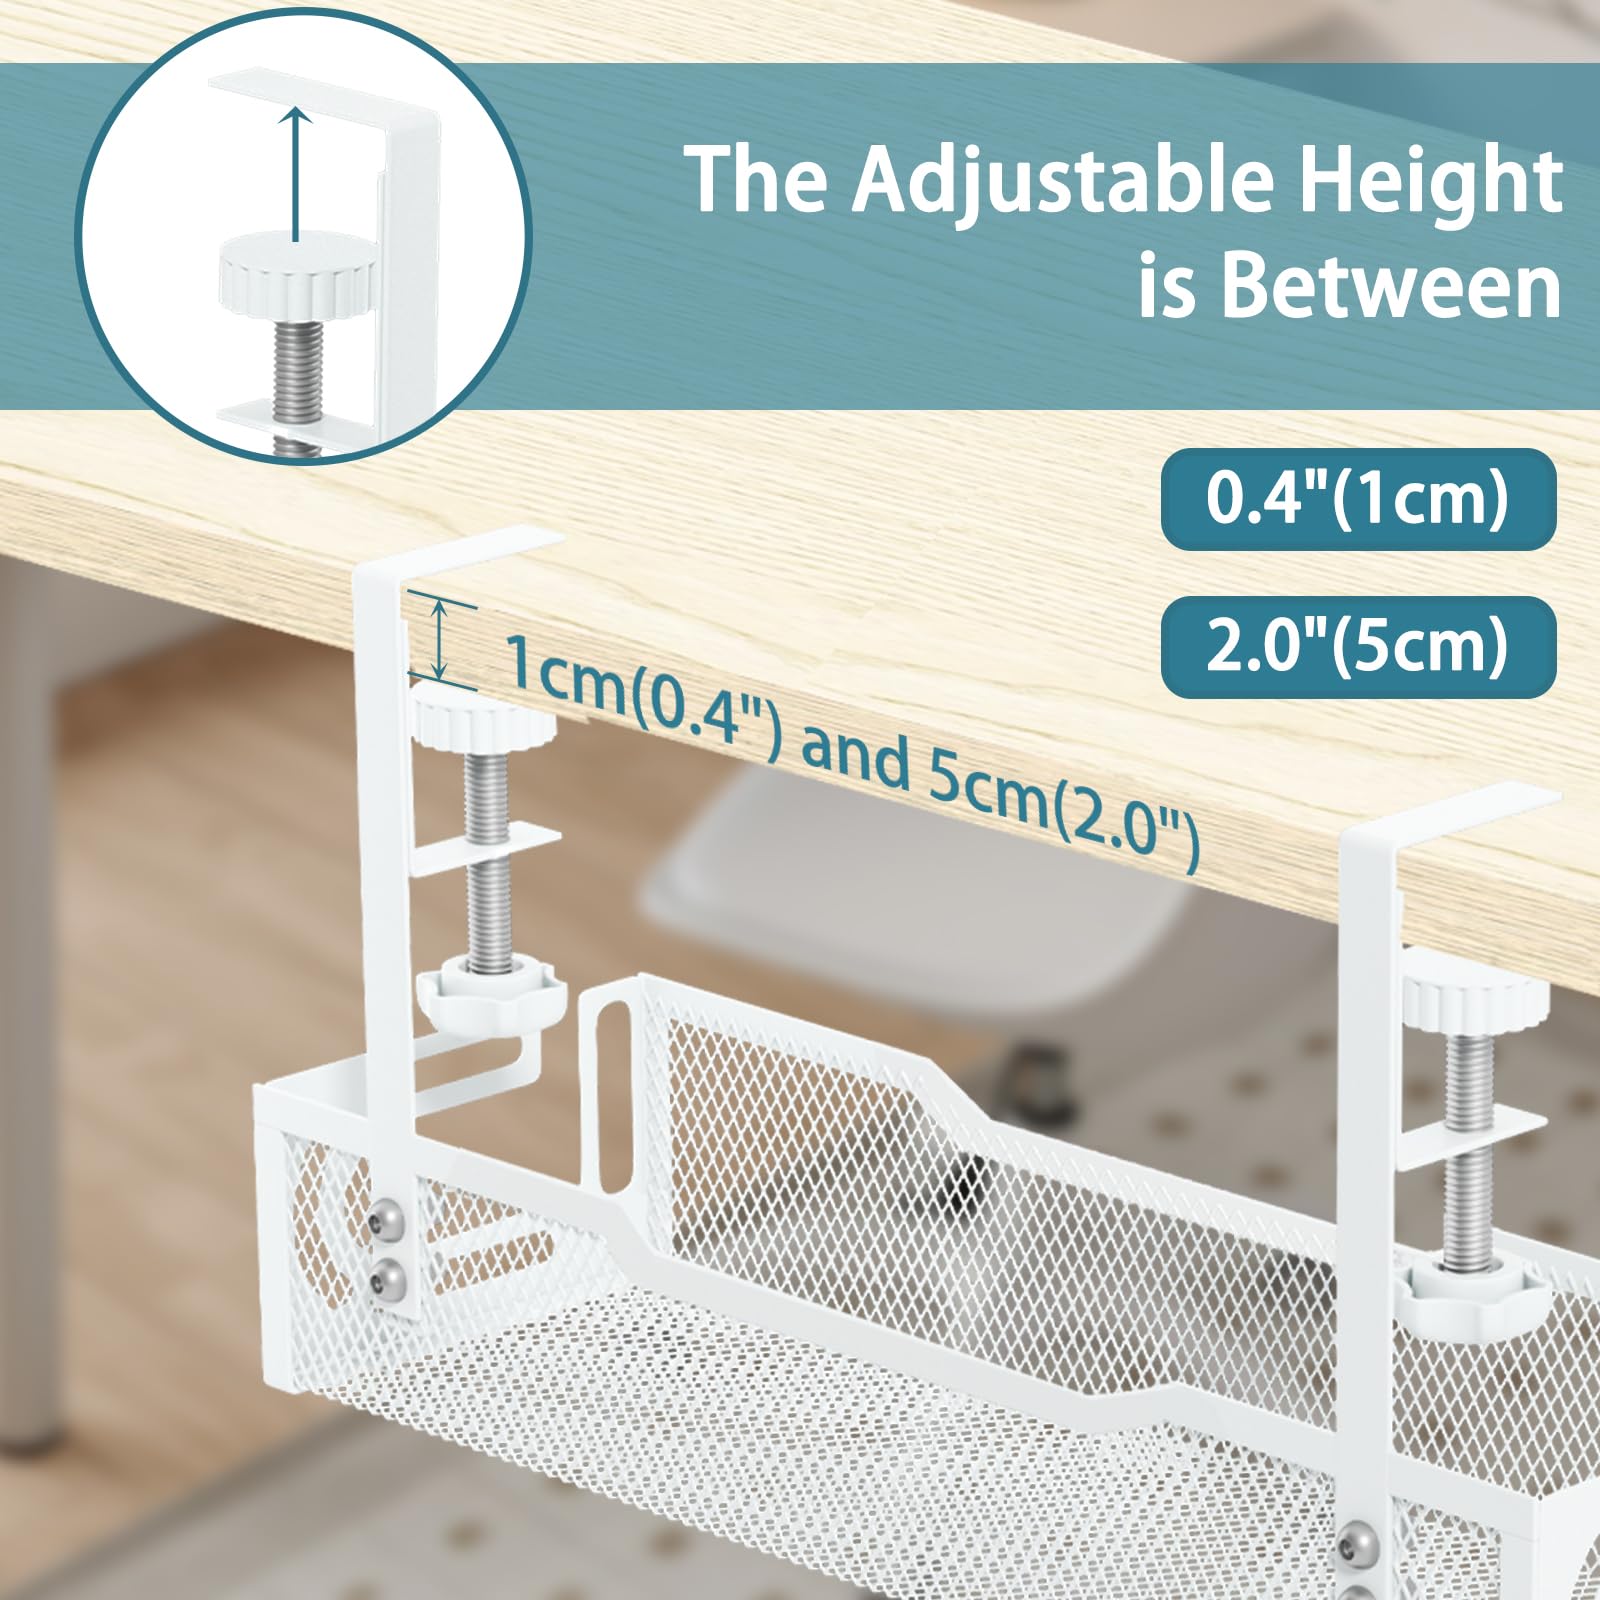

Ucang No-Drill Under Desk Cable Management Tray | Steel Mesh Wire Organizer for Home Office (White)
Pros
- No-drill clamp system works on wood, glass, and metal desks up to 2.2 inches thick
- Oversized capacity holds a standard power strip plus multiple cable runs in one tray
- High-quality steel construction feels solid and supports up to 15 lbs without sagging
- Side-opening slot makes cable swaps fast without removing the tray
- Clean white mesh finish blends into modern and minimalist home office setups
Cons
- White finish may show dust buildup inside the mesh and requires occasional wipe-downs to stay looking sharp
- Clamp design is not compatible with very thick desktops or desks with unusual edge profiles beyond 2.2 inches
- No color variety beyond white, which may not suit darker or wood-toned desk setups
Cable chaos is one of those small daily frustrations that quietly drags down the feel of an entire room. The Ucanng tray solves it in about ten minutes with no tools, no damage, and no commitment. You clip it under your desk, feed power strip and cords inside, and suddenly your workspace looks like it belongs in a design magazine.
What sets this apart from cheaper plastic alternatives is the steel mesh build. It feels sturdy the moment you handle it, the mesh is open enough to prevent heat from building up around your electronics, and the white finish is clean and understated enough to disappear under almost any desk. The side-opening slot is a genuinely clever detail that means you never have to unclip the whole tray just to add a new cable.
If you want a tangle-free, visitor-ready desk without drilling holes or spending a weekend reorganizing, this one delivers.
Styles it works with: Minimalist, Scandinavian, Modern, Contemporary Home Office
Best placed in: Under a home office desk, beneath a standing desk workstation, or under a gaming setup desk where cable clutter is heaviest
May not suit: Desks with decorative aprons or structural framing along the underside edge that blocks clamp access, or heavily styled traditional and rustic interiors where exposed metal mesh may feel out of place
Buy it if:
- You rent your home or apartment and cannot drill into furniture or walls to manage cables
- Your desk has a visible cable mess that is affecting how your home office or workspace looks and feels
- You use a power strip under your desk and want it fully hidden without a complex installation
Consider waiting if:
- You need a color other than white, such as black or silver, to better match your existing desk finish
Skip it if:
- Your desk edge is thicker than 2.2 inches or has a profile that prevents the clamps from sitting flush
- You need a cable management solution for walls or floor-level routing rather than the underside of a desk
Check the latest price and availability on Amazon before it sells out.

N NOROCME 192-Piece Cable Management Kit with Wire Sleves, Cord Clips, Cable Ties and Organizer Straps for Desk and TV Setup
Pros
- Six organizer types in one kit covers virtually every cable management scenario at home
- Strong self-adhesive backing on cord holders keeps them firmly in place on most surfaces
- No drilling or tools required makes installation genuinely quick and beginner-friendly
- Reusable velcro straps reduce waste and allow for easy reconfiguration when you move furniture
Cons
- Cable sleves are only 20 inches long, which may fall short for managing longer cable runs behind large entertainment walls
- Adhesive clips can leave residue or lose grip on textured or porous surfaces like rough brick or unfinished wood
If you have ever looked behind your desk or TV stand and felt instantly stressed by the tangle of cords, this kit is the straightforward fix you have been putting off. NOROCME packs six distinct organizer types into one box, so you are not buying a sleeve kit here and clip pack there. Everything arrives together, which means you can tackle your whole space in one afternoon.
What stands out is how thoughtfully the kit handles different scenarios. The braided sleeves bundle thick clusters of cables cleanly, the adhesive clips route individual cords along baseboards or desk edges, and the velcro straps keep everything cinched behind furniture. The dual color option, black and clear, is a small but smart detail that lets the organizers disappear into your decor rather than draw attention to themselves.
For home decor shoppers, the real win is how much cleaner a room feels once the cables are handled. A tidy media console or desk setup genuinely elevates the look of the whole room without buying new furniture. If you want a clutter-free, polished-looking home office or living room without spending hours on a complicated cable tray system, this one delivers.
Styles it works with: Minimalist, Scandinavian, Modern Industrial, Contemporary
Best placed in: Home office or standing desk setup, living room entertainment center or TV console, bedroom nightstand with charging cables
May not suit: Highly ornate or maximalist interiors where cable management is not a visual priority, and rental spaces with strict no-adhesive policies since the sticky clips may affect certain wall finishes upon removal
Buy it if:
- You have a home office or desk setup with multiple monitors, chargers, and peripherals that need to be neatly bundled and routed
- Your TV or entertainment center has visible cords running along the wall or baseboard and you want a clean, finished look without hiring someone
- You have cats or pets that chew on cables and need a protective sleeve solution alongside basic cord organization
Consider waiting if:
- You need a specific color beyond black or clear to match a very particular decor scheme
Skip it if:
- Your cable runs exceed 20 inches and you need longer continuous sleves to cover the full length cleanly
- Your walls or surfaces are heavily textured or porous, since the adhesive clips may not bond reliably without additional mounting hardware
Check the latest price and availability on Amazon before it sells out.

ScandinavianHub No-Screw Under Desk Cable Management Tray | Self-Adhesive | Set of 2 | Black
Pros
- Tool-free installation that takes about 2 minutes with no hardware needed
- Holds power strips and multiple cables without sagging or losing grip over time
- Adhesive tested on multiple surfaces including glass, wood, and smooth laminates
- Set of 2 provides enough coverage for most standard desk setups
Cons
- Requires a full24-hour cure time before loading cables, which delays immediate use
- Adhesive removal may leave residue or damage delicate desk finishes if repositioned
- No screw-mount fallback means surfaces that reject adhesives have no alternative
Cable chaos is one of the fastest ways to make an otherwise beautiful desk setup look unfinished. These trays from ScandinavianHub solve that problem quietly and effectively, tucking everything out of sight without requiring you to touch a drill or a screwdriver. The all-black PVC build is understated enough to disappear under most desks.
What stands out is how much these trays can actually hold. Power strips, chunky transformer bricks, and a tangle of charging cables all fit inside without the tray bowing or the adhesive giving way. For anyone running a dual-monitor setup or a home office with a lot of gear, that capacity matters more than it might seem upfront.
The 24-hour cure window is a small ask for a mount that holds this reliably long-term. If you want a desk that looks like a magazine photo without sacrificing any of your gear, this one delivers.
Styles it works with: Minimalist, Scandinavian, Modern, Industrial
Best placed in: Under a home office desk, beneath a living room media console, or mounted under a bedroom nightstand with charging cables
May not suit: Desks with textured, painted, or rough undersides where adhesive bonding is unreliable. Also not ideal for renters who cannot risk any surface residue at move-out.
Buy it if:
- You have a smooth-surface desk and want a clean, cable-free look without any drilling
- You run multiple devices and need somewhere to stash a power strip out of sight
- You are setting up a home office or streaming desk and want a polished result fast
Consider waiting if:
- You prefer a white colorway to match a light-colored desk, as availability varies by retailer
Skip it if:
- Your desk has a textured, painted, or uneven underside that will not bond with adhesive
- You need a mounting solution that can be repositioned frequently without surface damage
Check the latest price and availability on Amazon before it sells out.
The No-Drill Tray That Solves Step 3 (Ucanng Under Desk Cable Management Tray)
This mesh tray is the direct answer to Step 3’s horizontal run. It mounts with no drilling, so renters and glass-desk owners can skip the screws entirely, and the open mesh design lets adapters vent instead of baking inside a solid box. At a 4.8 rating it’s the highest-scored pick here, and the mesh construction is why. Heat escapes, and you can see the bundle at a glance instead of fishing blind. The tray catches cables before they drop, which is the exact transition point where most setups turn into a nest. Confirm your under-desk clearance first, since it hangs a few inches below the surface.
The Full Kit for Wiring From Scratch (N NOROCME 192-Piece Cable Management Kit)
If you’re starting a setup cold, this 192-piece kit covers Steps 1, 2, and 4 in one box. You get wire sleeves for bundling permanent runs, cord clips for anchoring reachable ends, and rolls of ties for the service loops. The 4.6 rating reflects range over any single standout part. It’s the bulk-supply pick, not a specialized tool. Use the sleeves on your vertical drop, the clips at the desk edge, and save the ties for coiling slack. For a three-monitor workstation with a dozen cables, having every fastener on hand beats three separate trips to the hardware store.

The Self-Adhesive Tray for Glass and Rental Desks (ScandinavianHubCableTrays No-Screw Tray)
This tray is the alternative to the Ucanng when you want a fully enclosed channel rather than open mesh. The self-adhesive mount holds without a single screw, so it’s the safe choice for a glass desktop or a lease that forbids drilling. At a 4.5 rating it trades the mesh venting for a cleaner enclosed look that hides the bundle completely. Pick this one if aesthetics matter more than airflow and your load is light, a couple of monitors and a laptop, not a heat-generating tower. Clean the mounting surface with alcohol first so the adhesive grabs and stays put.
Frequently Asked Questions
What if my desk is glass and I can’t drill any holes?
It depends on the mount type, but you have good options. Self-adhesive trays and mounting tape rated for 5 pounds or more hold fine on glass once you clean the surface with rubbing alcohol first. Skip anything requiring screws. The ScandinavianHub tray and Velcro-backed clips were built for exactly this situation.
What if my room is too small for a floor channel?
No problem, go vertical instead of horizontal. A small room usually means a small desk, so route everything up a single leg with a fabric sleeve and mount the power strip to the underside. You reclaim 100 percent of the floor and lose nothing in capacity. Under-desk trays need only 3 to 4 inches of drop clearance.
What if my desk sits in the middle of the room with no wall behind it?
It depends on outlet placement, but a floating desk actually simplifies things. Mount the power strip under the desk and run one clean cord to the nearest floor or wall outlet inside a floor-cord cover. Bundle everything else so it never touches the ground. A center-room desk shows its back to everyone, so a tray that fully hides the bundle earns its spot.
What if my setup keeps changing every few months?
Then build for swaps, not permanence. Use Velcro straps instead of zip ties everywhere, leave 6 to 8 inches of service loop on any cable you touch weekly, and never bundle swap cables into the permanent run. A modular system takes 20 minutes to reconfigure. A zip-tied one takes an afternoon and a pair of snips.
What if I have way more cables than the tray can hold?
Almost always the fix is a second tray, not a fuller one. Never pack a tray past 70 percent, since bundled adapters run warm, and ASTM flammability guidance around electrical loads assumes airflow. Add a second tray on the opposite back edge and split power from data across the two. Two half-full trays beat one crammed one on both heat and access.
Bottom Line
Sort before you bundle. That single habit prevents most cable messes, because swap cables stay reachable and permanent runs get tied down for good. Mount a power strip off the floor, catch the horizontal run in a tray, and anchor every loose end at the desk edge with 6 inches of slack. If you’re wiring from scratch, start with a full clip-and-sleeve kit. If cables already pool on your floor, a no-drill tray fixes it in an afternoon. Build it as a system and it holds for years.










Write Your Review
No reviews yet. Be the first to share your experience!