

> Editorial Note: I’m Liam Wright, an outdoor and garden editor. I grew up in my family’s landscaping business and now cover what actually survives a season of UV, rain, and freeze-thaw cycles. The picks here are evaluated against ASTM weatherability standards and manufacturer durability ratings.
Most budget patios go wrong because people buy decor before they set the layout. A $20 lantern won’t fix chairs that block the door, a rug that’s 18 inches too small, or a dining table with no pullout room. Start with the footprint, then layer in shade, lighting, and small outdoor pieces that earn their space; the same measuring logic shows up in best patio umbrella, best outdoor rug, best solar outdoor lights, how to choose a patio conversation set, and how to choose a patio dining table. Cheap can look intentional. Random can’t.
The Ground Rules Before You Start
Set the walking path first. Keep at least 30 inches of clear traffic space from the house door to the yard, stairs, grill, or gate. If people have to turn sideways to pass a chair, the patio will feel smaller than it is. Pick one anchor zone before buying anything: conversation, dining, or lounging. Not all three on a 6×10 foot slab. Then cap the color palette at three finishes, such as black metal, warm wood, and tan cushions. Apartment Therapy often frames small outdoor spaces around restraint, and that’s the right instinct here.
Step 1: Map the Anchor Zone Before You Buy
Measure the patio wall to wall, then subtract the clearance you actually need. A bistro table needs about 36 inches behind each chair if people will pull the chair out and sit down. A small conversation setup needs roughly 30 inches between the seating edge and any walkway. If your patio is 8×10 feet, that doesn’t mean you have 80 square feet for furniture. After clearances, the usable center may be closer to 5×7 feet.
Choose one anchor. For most budget patios, the best anchor is either a two-seat conversation corner or a small dining setup, not a full outdoor room. Put painter’s tape on the ground where the furniture would sit. Walk through it with a laundry basket in your hands. If the basket bumps the tape, the plan is too tight.
This is where the budget gets protected. You won’t buy a rug that sits under only half the chairs. You won’t buy side tables that turn the door swing into an obstacle. Measure first. Spend second.
Step 2: Use a Rug or Border to Make It Feel Finished
A patio feels unfinished when every piece floats on concrete. The cheapest fix is a visual boundary: an outdoor rug, a painted paver border, a line of planters, or even two matching mats laid side by side. The boundary should be large enough to hold the front legs of the main seating. For two chairs and a small table, a 5×7 foot rug usually works. For a compact loveseat, aim for 6×9 feet if the slab allows it.
Don’t chase a rug pattern first. Chase scale. Wirecutter’s outdoor furniture coverage is consistent on one point: materials matter more outside because UV, water, and grit punish weak finishes. Look for polypropylene, PET, or recycled plastic rugs if the patio gets rain. Natural fiber looks softer in photos, but it breaks down faster on damp concrete.
If a rug isn’t in the budget, create the same effect with spacing. Put two planters 48 to 60 inches apart to frame the seating zone. Add a low table in the middle. The eye reads that as a room. Simple trick.
Step 3: Build Height With Shade, Hooks, and Vertical Decor
Budget patios look flat when every object sits below knee height. Add one vertical layer, preferably above 5 feet, so the space feels designed from floor to eye level. That can be a patio umbrella, a wall hook with a hanging planter, string lights, or a slim trellis. Keep anything attached to siding or railing within the hardware’s stated load rating; many clip-style hooks are meant for light decor, not heavy baskets after a rainstorm.
Place shade where people sit, not where the patio happens to have open space. For a two-chair setup, the umbrella or shade point should cover the center table and at least 24 inches of each seat. For lights, hang them high enough that the lowest point clears 7 feet where people walk. On a balcony, keep the glow warm and low. Outdoor lighting around 2700K looks calmer than cold blue-white light.
ASTM weatherability standards focus on how materials handle UV, moisture, and temperature swings. You don’t need a lab sheet for every $15 hook, but you do need stainless steel, coated metal, or UV-rated plastic when the piece stays outside. Rust is not a style choice.
Step 4: Add Small Decor Only Where It Solves a Job
Now add the inexpensive pieces: lanterns, a compact ashtray with a lid, solar figures, side-table trays, cushion covers, and plant pots. Give each item a job. A lidded tabletop piece keeps ash or match waste contained. A solar accent marks the patio edge after dark. A tray gathers drinks so a tiny table doesn’t turn into clutter by Saturday night.
Use the 3-foot rule for small decor. If you can’t see the item from 3 feet away, it doesn’t need to be on the patio. Tiny objects disappear outdoors because the background is bigger, brighter, and messier than a living room. Choose fewer pieces with more scale: one 10-inch lantern beats four little trinkets.
Keep soft goods disciplined. Two outdoor pillows are enough for a loveseat under 60 inches wide. Four pillows on a small bench means no one has room to sit. Store cushions when heavy rain is coming, even if the listing says weather-resistant. Resistant doesn’t mean careless.
The Right Products Make It Easier
The three picks below focus on budget-friendly finishing details with clear outdoor use: rain coverage, no-drill hanging, and solar lighting. Use them after the layout is set, not before; OILP belongs on the tabletop, MIUKAA handles vertical styling, and Nacome adds a low-cost light point.
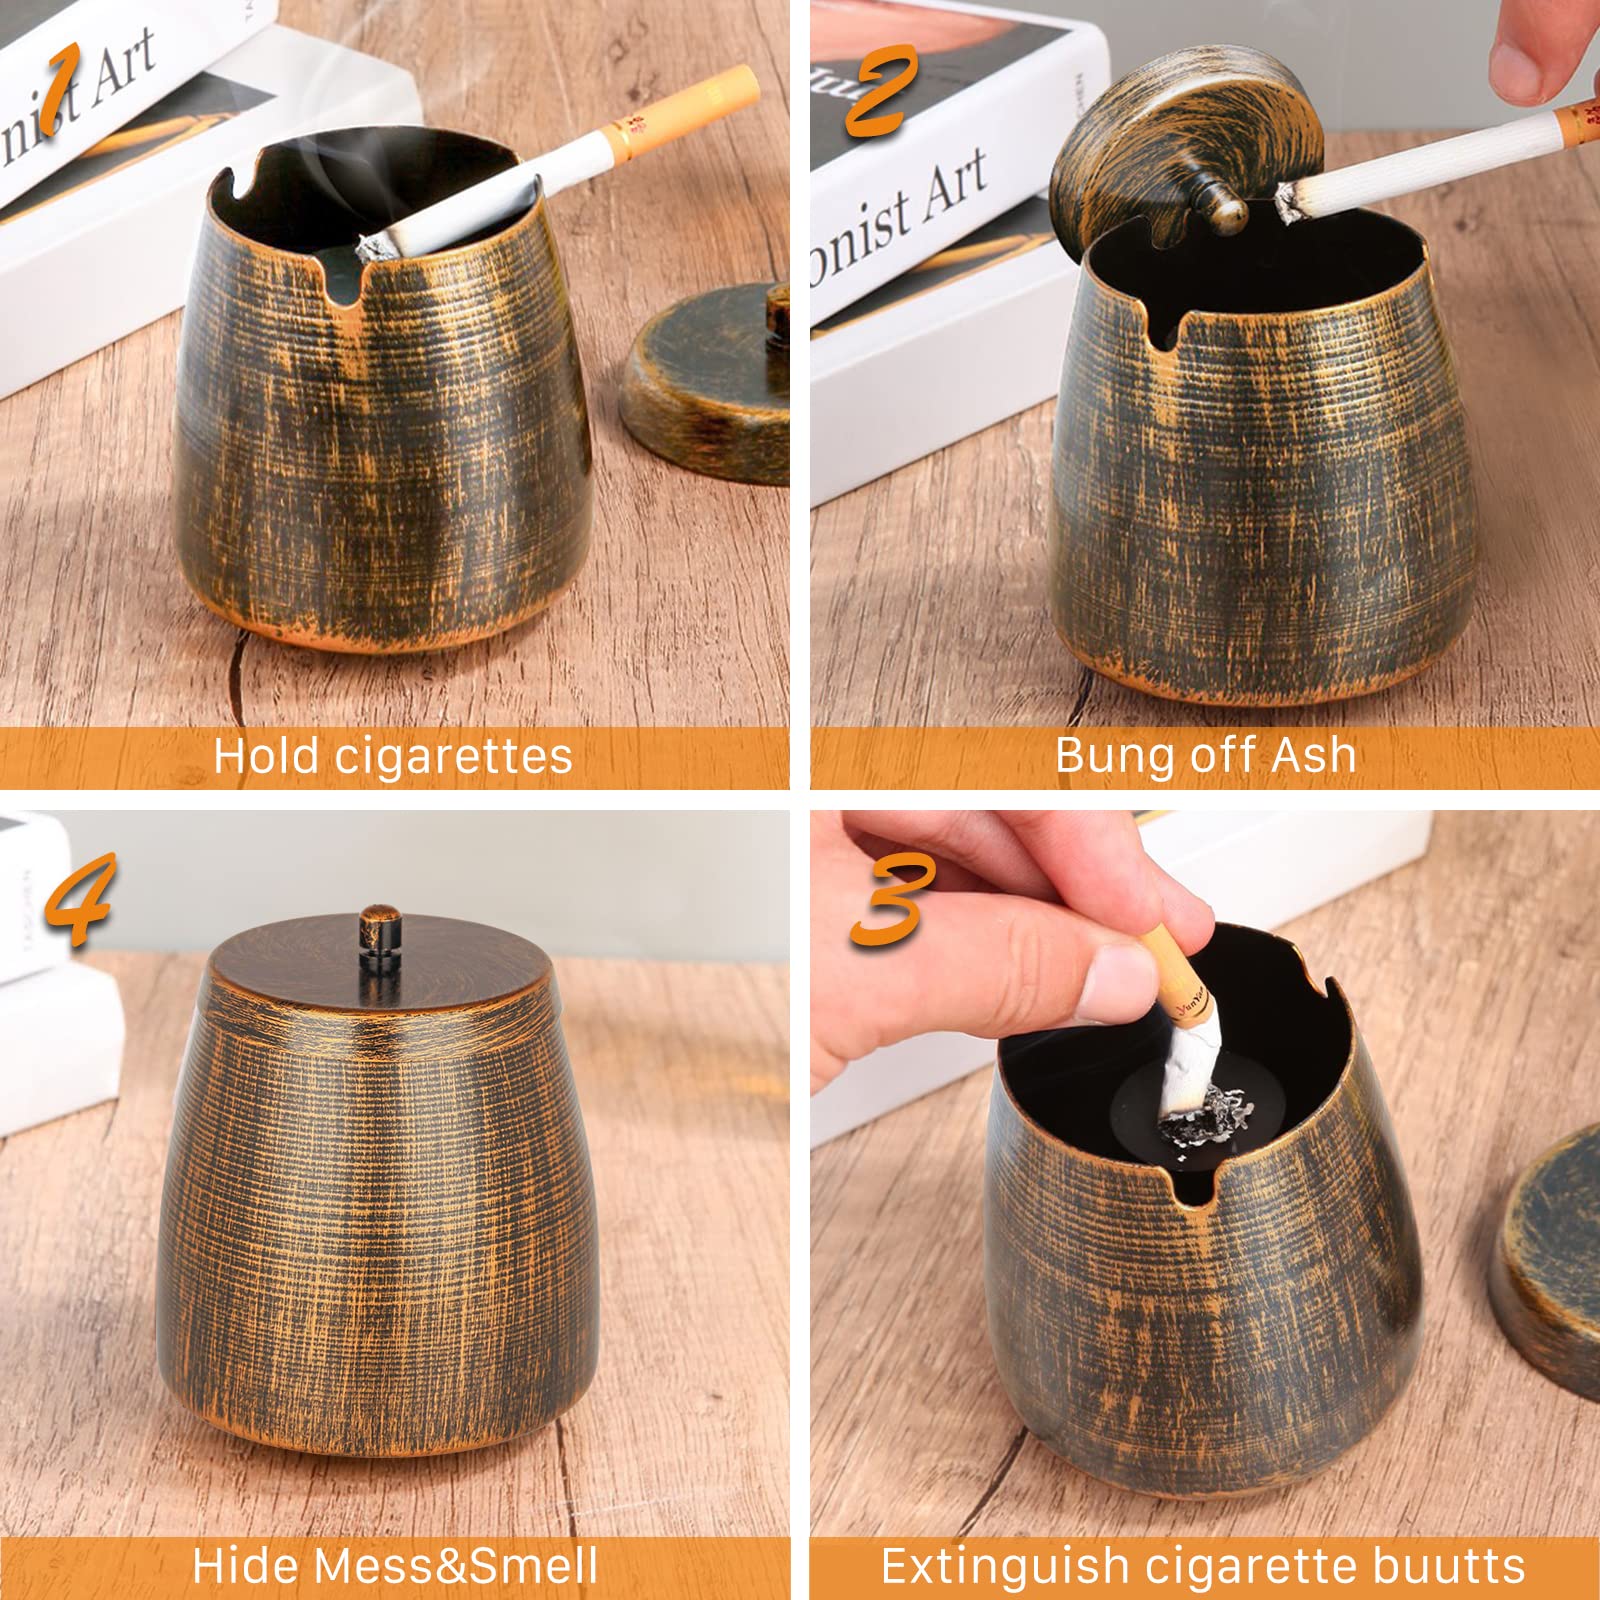

Pros
- Durable metal construction won't shatter if knocked off a table
- Lid effectively contains odor, ash, and rain
- Attractive retro copper finish blends with most outdoor furniture
- Extremely affordable at under seven dollars
- Easy disassembly for quick cleaning
Cons
- Small size only accommodates one smoker at a time
- Appears much smaller in person than product photos suggest
- Not ideal for heavy smokers who need high-capacity ash storage
This little OILP ashtray solves the three most annoying problems with outdoor ashtrays in one tidy package. The fitted lid keeps rain out, holds ash in, and traps that stale smoke smell so your patio stays pleasant for everyone. It looks like a piece of vintage decor rather than something you want to hide when guests come over.
The copper-tone metal finish has a warm, antique quality that pairs well with wrought iron patio sets, wooden side tables, or even a modern concrete planter arrangement. It sits quietly on the table without drawing attention for the wrong reasons. And because it is metal, you never have to worry about a gust of wind sending it off the table to shatter on the ground.
If you want a neat, odor-free smoking spot on your patio without sacrificing style or spending more than a few dollars, this one delivers.
Styles it works with: Industrial, Mid-Century Modern, Rustic Farmhouse, Vintage Eclectic
Best placed in: Patio side table, covered porch railing shelf, home office desk, balcony ledge
May not suit: Households neding a communal ashtray for multiple smokers, or spaces where a larger statement piece is preferred due to its compact size
Buy it if:
- You smoke alone on your patio and want to keep the table clean and odor-free
- You have broken glass or ceramic ashtrays before and need something durable
- You want an ashtray that looks like decor rather than an ugly utility item
Consider waiting if:
- You need the X-large version for group gatherings but want to compare sizes first
Skip it if:
- You regularly host multiple smokers and need high capacity
- You want a large ashtray that is easy to spot from across the yard
Check the latest price and availability on Amazon before it sells out.

MIUKAA Vinyl Siding Hooks 4-Pack No-Drill Stainless Steel Outdoor Clips for String Lights Wreaths Patio Decor
Pros
- Truly damage-free installation with no tools, no adhesive, and no holes left behind
- Heavy-duty 304 stainless steel at 0.8mm thickness stands up to outdoor weather long-term
- 12 lb weight capacity per hook handles most wreaths and string light runs with ease
- Versatile fit for wreaths, garlands, string lights, and a wide range of porch decor
- Over 16,000 reviews at a 4.6-star rating signals consistent real-world performance
Cons
- Only works with horizontal vinyl siding and is not compatible with wood, brick, stuco, or vertical siding profiles
- A 4-pack may fall short for larger string light or multi-piece garland installations
- No finish or color variants listed, which may limit how seamlessly it blends with all siding tones
If you have ever put off decorating your front porch because you did not want to drill into your siding, MIUKAA hooks solve that problem entirely. They slide onto horizontal vinyl siding in seconds and hold firmly without any tools, adhesive, or anchors. No patching. No staining. No regrets when the season changes.
The 304 stainless steel build is what separates these from the flimsy plastic clips sold elsewhere. At 0.8mm thick and rated to 12 lbs per hook, they handle full-size wreaths, layered garlands, and string light runs without flexing or slipping. After a full cycle of seasons through rain, heat, and cold, they hold their shape and finish.
What makes them stand out visually is how invisible they become once your decor is up. The slek, minimal profile puts all attention on your wreath or lights rather than the hardware. If you want polished seasonal curb appeal without drilling a single hole, this one delivers.
Styles it works with: Modern Farmhouse, Traditional, Craftsman, Coastal Cottage
Best placed in: Front porch or entryway exterior siding, back deck or patio facing wall, garage-side siding for holiday light displays
May not suit: Homes with brick, wood, stucco, or vertical siding since these hooks are designed specifically for horizontal vinyl siding panels. Also not suited for indoor walls or any application requiring a permanent, fixed anchor point.
Buy it if:
- You want to hang a wreath, string lights, or garland on your vinyl siding without drilling or leaving any marks behind
- You are a renter or plan to move and need a fully damage-free outdoor decorating option
- You swap out seasonal or holiday decor regularly and want a reusable hook built to survive year-round outdoor conditions
Consider waiting if:
- You need more than four hooks and want to compare multi-pack sizes before committing to a quantity
Skip it if:
- Your home exterior is brick, wood, stucco, or features vertical siding since this product only fits horizontal vinyl siding
- You need a permanent fixed anchor for items consistently exceding 12 lbs
Check the latest price and availability on Amazon before it sells out.

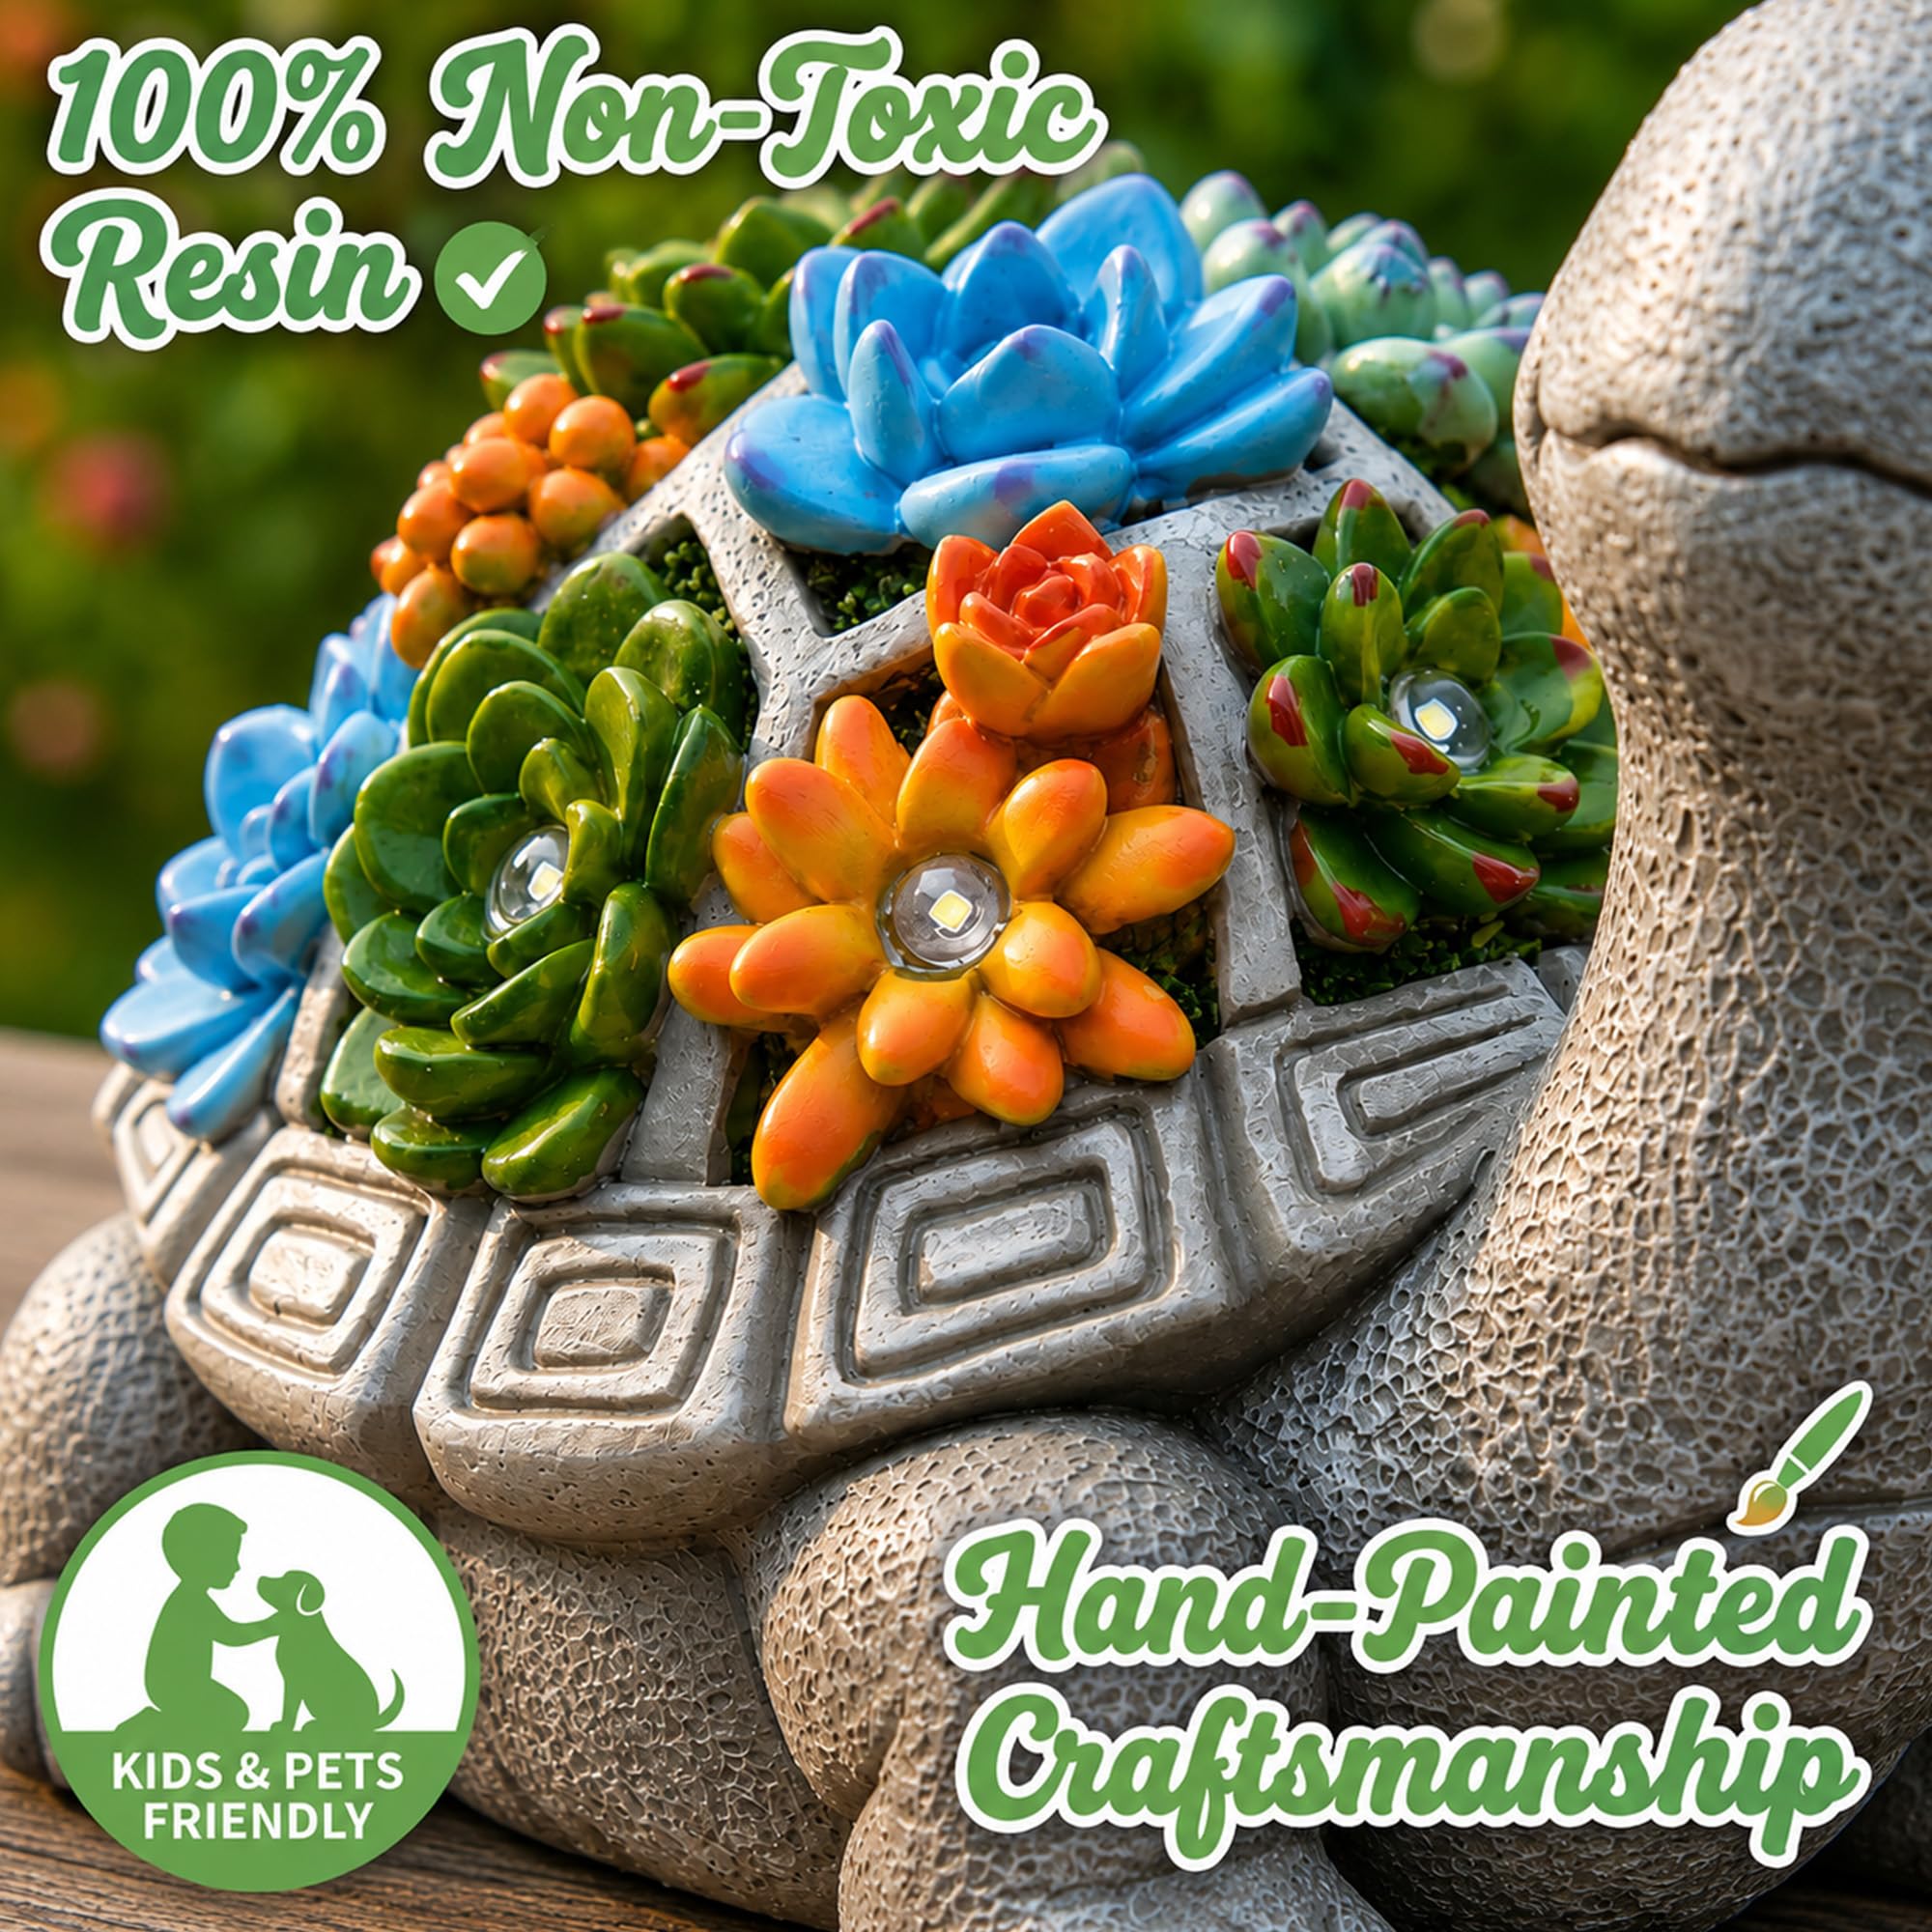
Nacome Solar Turtle Garden Statue with Succulent & 7 LED Lights - Weatherproof Outdoor Lawn Decor Ornament
Pros
- Fully automatic solar operation with 8-10 hour charge yielding up to 10 hours of light
- Durable composite resin withstands all-season outdoor conditions
- Eco-conscious materials with GRS-certified recycled content and pulp packaging
- Highly rated across 18,000+ reviews with consistent 4.5-star satisfaction
- Attractive gift-ready packaging eliminates the need for extra wrapping
Cons
- Requires 6-8 hours of direct sunlight for a full charge, so shaded yards will see reduced glow time
- Resin construction looks realistic but may feel lightweight compared to actual stone statues
- LED brightness is ambient and decorative, not functional pathway lighting
This little turtle statue punches well above its price point. The faux succulent shell is a clever design touch that gives it personality without looking kitschy, and the warm LED glow it casts after dark genuinely transforms a plain garden corner or porch step into something you want to linger near.
What sets it apart from generic solar stakes or basic garden figurines is how polished it looks in person. The resin has a hand-painted, stone-like finish that photographs well and holds up through seasons of weather. It is the kind of piece guests notice and ask about.
If you want a charming nightime accent for your outdoor space without dealing with wiring, batteries, or remembering to flip a switch, this one delivers.
Styles it works with: Cottage Garden, Coastal Casual, Boho Outdoor, Eclectic Porch
Best placed in: Front porch steps, garden bed border, patio side table, balcony shelf
May not suit: Ultra-modern or minimalist outdoor spaces where whimsical figurines clash with clean lines; heavily shaded yards where it cannot get enough sun to charge fully
Buy it if:
- You want efortless evening ambiance in your garden or on your porch without any wiring
- You are shopping for a thoughtful, under-$25 gift for a mom, grandma, or gardening enthusiast
- You need a weatherproof decoration that can stay outside through all four seasons
Consider waiting if:
- You prefer a different animal style and want to browse the full Nacome solar collection first
Skip it if:
- You need bright, functional path lighting rather than soft decorative glow
- Your placement spot gets fewer than 4 hours of direct sunlight per day
Check the latest price and availability on Amazon before it sells out.
OILP makes sense for Step 4 if the patio is used for smoking, grilling prep, or evening drinks where small waste tends to scatter. The covered metal design matters more than the retro look because wind can turn an open dish into a mess in 10 minutes. Keep it on a side table at least 18 inches from fabric cushions and under a covered zone if possible. With a 4.7 owner rating, it’s the practical little piece that keeps a budget setup from feeling sloppy.
MIUKAA fits Step 3 because no-drill hanging is the easiest way to add height without buying a pergola or freestanding frame. The stainless steel vinyl siding hooks work best for light decor: small planters, seasonal signs, or a string-light guide point. Don’t overload them with wet soil baskets. Use one hook every 24 to 36 inches for balanced spacing, and keep hanging items above shoulder height so the walkway stays clear. Its 4.6 owner rating lines up with that narrow, useful job.
Nacome is the small lighting move for patios that don’t have an outlet. The solar turtle statue won’t light a dining table by itself, but it can mark a step, planter edge, or balcony corner after dark. That’s enough. Place it where it gets 6 hours of direct sun, then use it as a visual endpoint rather than the main light source. The 4.5 owner rating is solid for a decorative solar accent, especially if you want charm without running cable.
Frequently Asked Questions
What if my patio is only 6×8 feet?
Choose one function. A 6×8 foot patio can handle two slim chairs and a 16- to 20-inch side table, or one small bistro set, but not both. Keep a 30-inch path from the door. Skip oversized planters and use wall hooks instead.
What if my balcony has no wall for decor?
Use the railing and floor line. A 5×7 foot outdoor rug can define the zone, while a solar accent or two matching planters mark the corners. Keep decor below railing height if your building rules restrict hanging items. No surprises for downstairs neighbors.
What if the patio gets full sun all afternoon?
Start with shade before cushions. A 7.5- to 9-foot umbrella usually covers a small dining or conversation zone, but check the base weight: 40 to 50 pounds is a safer target for many freestanding umbrellas. Choose lighter fabrics because dark cushions absorb heat fast.
What if I rent and can’t drill into anything?
Use clip hooks, weighted planters, outdoor rugs, and freestanding lamps or solar decor. Keep every piece removable and avoid adhesives on painted surfaces. For siding hooks, stay within the listed load limit and space them 24 inches apart for light garlands or small signs.
What if my patio furniture is mismatched?
Make the finishes repeat. Two black metal pieces, two warm wood pieces, or two tan textiles can make mismatched furniture look deliberate. Keep the seating within 18 inches of the table edge so the group reads as one zone. The repeat matters more than a full set.
Bottom Line
The rule that matters most is sequence: measure the patio, choose one anchor zone, then decorate the edges. That’s how a budget patio starts to feel planned instead of leftover. The main exception is a patio with harsh sun; shade moves ahead of decor because no one uses a pretty seat that’s too hot by 3 p.m. Spend on clearance, scale, and weather-safe materials first. The small pieces only work after that foundation is set.
Write Your Review
No reviews yet. Be the first to share your experience!