

> Editorial Note: I’m Erin Schwartz, and I cover home decor with a bias toward what actually works in a real room. The guidance here weighs scale, layout, and materials against Apartment Therapy and Wirecutter coverage rather than styling a space that nobody lives in.
Outside mount blinds forgive a crooked window that inside mount would expose, but they only look right if you measure the coverage, not just the opening. The blind hangs on the wall or trim above the window, so you’re sizing the finished treatment plus its overlap, not the raw hole. Add too little and light leaks around the edges; add too much and it looks oversized. Before you measure, it helps to know how to clean window blinds and how to clean venetian blinds for upkeep, curtain blinds and window curtain rods if you’re layering fabric, and bay window curtains and small window curtains show how coverage changes with window shape, while how to measure a tv uses the same measure-the-finished-size logic.
When Should You Choose an Outside Mount?
Choose an outside mount when the frame depth is under 2 inches, the window is out of square, or you want maximum light blockage. Because the blind overlaps the opening instead of sitting inside it, it hides a crooked frame and stops light leaking down the sides. It’s also the only option on windows with no usable recess, like a flush-set or shallow frame.
Outside mount needs flat wall or trim above and beside the window to anchor the brackets, usually 2 to 3 inches. It makes a small window look larger by extending past the glass, which is a real styling advantage in a cramped room. Confirm you have solid mounting surface above the opening before committing, since brackets in drywall alone need anchors.
How Do You Measure the Width for Outside Mount?
Measure the exact width of the window opening, then add at least 3 inches to each side for overlap. That extra 6 inches total blocks side light and gives the blind a finished, intentional look rather than a skimpy one. Unlike inside mount, here you report the total finished width you want, overlap included, since nothing gets deducted.
Measure from where the left bracket will sit to where the right one will, if you’ve already picked bracket points. For a picture window or a set of stacked panels, more overlap looks better than less. Hold the tape level across the wall and mark your intended outer edges with a pencil so you can picture the final footprint before ordering. Don’t guess the edges by eye, since a skimpy mark undersizes the whole blind.
How Do You Measure the Height and Overlap?
Measure the opening height, then add about 3 inches at the top for the mounting brackets and headrail. That top allowance gives room to fix the brackets above the frame so the blind clears the glass when raised. For full coverage at the bottom, extend a couple inches past the sill or to wherever you want the blind to end.
Decide the bottom endpoint by look and function: past the sill for full blackout, level with the sill for a trimmer profile. A laser measure speeds up tall windows where a tape sags, giving a clean floor-to-mark reading. Mark the top bracket line with a level before drilling, because an outside mount hangs only as straight as your bracket line. Record the finished height you want, brackets and overlap included.
What Mistakes Cause Light Gaps or a Bad Fit?
The biggest mistake is skimping on overlap, which leaves light bleeding around every edge. Three inches per side is the floor, not the goal, so on a bedroom window where blackout matters, go wider. If you measure only the opening and order that size, you’ll defeat the entire point of an outside mount.
The second mistake is forgetting the top bracket allowance and ordering a blind that ends right at the frame, leaving nowhere to mount without covering the glass. The third is an unlevel bracket line: because the blind hangs on the wall, any tilt in your bracket marks shows immediately. Always use a level and measure the bracket height on both sides. Check for wall studs or use proper anchors, since a heavy blind pulls out of bare drywall.
What You’ll Need
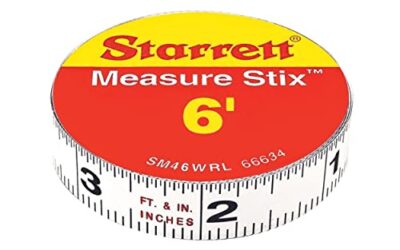
The tools below are ranked by owner rating and split into two types: stick-on tapes for marking bracket lines and laser measures for fast, sag-free reads on tall windows. For wide or high windows a laser earns its keep; for quick marks a peel-and-stick tape is enough. Start with #1 for an adhesive reference tape.

Pros
- Stays put once applied, no sliding or peeling during use
- Readable from both left and right sides saves time during layout work
- 16-foot length covers most standard workbench and table saw setups
- Low-profile design doesn't interfere with clamps or project materials
Cons
- No customer reviews yet to confirm long-term adhesive performance
- Once stuck down, repositioning may damage the tape or leave residue
- Not suitable for curved surfaces or portable measurement needs
If you have ever stopped mid-cut to search for a tape measure buried under wood scraps, this tape solves that exact frustration. It turns any flat workshop surface into a built-in measuring station, so your measurements are always right there when you need them.
The dual-sided printing is smarter than it sounds. Whether you are standing on the left side of your table saw or the right, the numbers face you. No more mental math to read backwards measurements. For anyone who does repetitive cuts or layout work, that small detail saves dozens of interruptions over the course of a project.
If you want a permanent measurement reference on your workbench or saw station without the bulk of a mounted ruler, this one delivers.
Styles it works with: Industrial Workshop, Garage Organization, Modern Utilitarian, Maker Spaces
Best placed in: Table saw fence rails, workbench front edges, miter saw station walls, cutting table surfaces
May not suit: Spaces where you need portable measurements, curved or uneven surfaces, temporary workstations that get moved frequently
Buy it if:
- You do frequent woodworking or DIY projects that require repetitive measurements
- Your workshop has a dedicated table saw, miter station, or cutting bench that stays in one place
- You are tired of setting down tools to grab a tape measure five times per cut
Consider waiting if:
- You need to see more customer reviews confirming the adhesive holds up over months of use
Skip it if:
- You need a portable tape measure for job sites or moving between rooms
- Your work surfaces are curved, textured, or get wiped down with solvents regularly
Check the latest price and availability on Amazon before it sells out.

Pros
- Highly accurate to 1/16 inch for precise material estimates
- Weatherproof design works in outdoor or messy job site conditions
- Backlit screen readable in complete darkness
- Compact enough to carry daily without adding bulk
- Add and subtract feature simplifies complex layout calculations
Cons
- No customer reviews available yet to verify long-term durability
- Limited to straight-line measurements, cannot measure curves or irregular shapes
- 10-measurement memory may fill quickly on larger projects
This is the measuring tool that finally makes sense for real people doing real projects. Whether you are planning a furniture layout, calculating how much paint you need, or figuring out if that new sofa will actually fit, the Bosch GLM165-40 gives you answers in seconds instead of making you crawl around with a tape measure.
The backlit display is a genuine game-changer if you have ever tried to read measurements in a dim garage or unfinished basement. And because it is weatherproof, you can measure your deck dimensions in the morning dew or check fence line distances after a rain without babying your tool. It slips into a pocket but works like equipment that costs twice as much.
If you want accurate measurements for home projects without wrestling with a 25-foot tape that never retracts properly, this one delivers.
Styles it works with: Modern, Industrial, Minimalist, Contemporary
Best placed in: Tool drawer, garage workbench, kitchen junk drawer for quick furniture measurements, car console for errands involving measurements
May not suit: Homes where no one does DIY projects or furniture rearranging, renters who cannot make modifications and rarely need precise measurements
Buy it if:
- You regularly rearrange furniture or plan room layouts and need to know if things will fit before you start shoving
- You are tackling DIY projects like painting, flooring, or landscaping and want accurate material estimates the first time
- You work in trades or home services and need a reliable tool that survives real job site conditions
Consider waiting if:
- You want to read verified customer reviews before committing to this model
Skip it if:
- You only measure things once or twice a year and a basic tape measure works fine for you
- You need to measure curved surfaces, angles, or irregular shapes that require a flexible measuring tool
Check the latest price and availability on Amazon before it sells out.

Pros
- Extremely accurate (1/16 inch) for confident buying decisions on furniture and decor
- Simple two-button design makes it beginner-friendly
- Backlit display works well in dark spaces like closets and basements
- Compact enough to carry in a pocket or purse while shopping
- Versatile rounding options from 1/2 inch down to 1/32 inch
Cons
- No reviews yet to confirm real-world performance and durability
- Requires 2 AA batteries which are not always included long-term
- Class II laser may not be visible in bright outdoor sunlight
If you've ever bought a sofa that turned out too big for your living room or curtains that hung awkwardly short, you need this tool. The Bosch Blaze takes the guesswork out of decorating by giving you exact measurements in seconds. Point, click, done. No crawling on the floor with a tape measure that keeps snapping back.
What makes it special for home decor lovers is the backlit display and rounding button. Measuring a dark corner for a reading nook? The screen lights up. Need to know if that dresser will fit? Round to the nearest half-inch instantly. It's small enough to toss in your bag when furniture shopping, and accurate enough (1/16 inch) to trust for custom orders like blinds or built-in shelving.
If you want professional-level accuracy without the learning curve of complicated tools, this one delivers.
Styles it works with: Modern, Minimalist, Scandinavian, Industrial (works with any style since it's a tool, not decor)
Best placed in: Tool drawer, kitchen junk drawer, entryway console for quick access, or carry in your purse/bag when shopping for furniture
May not suit: Homes where you rarely rearrange furniture or measure spaces; outdoor use in very bright sunlight where the laser may be hard to see
Buy it if:
- You frequently rearrange furniture or shop for rugs, curtains, and home decor that needs exact sizing
- You're planning a renovation, remodel, or custom built-in project and need reliable measurements
- You want to eliminate buying mistakes caused by guessing dimensions or using a flimsy tape measure
Consider waiting if:
- You want to see verified customer reviews first since this model has no reviews yet
Skip it if:
- You only measure things once or twice a year and a basic tape measure works fine for you
- You need a tool with bluetooth connectivity or advanced features like area/volume calculation
Check the latest price and availability on Amazon before it sells out.

Pros
- Professional-grade 1/16" accuracy beats standard laser measures and traditional tape measures
- Eight measuring modes handle everything from simple distance to complex angle calculations
- Lightning-fast 0.4 second response time keeps projects moving without waiting for readings
- IP54 rating protects against dust and water splashes during messy renovation work
- Exceptional battery life with 5,000+ measurements and auto shut-off to prevent drain
Cons
- Struggles with accuracy on glass, mirrors, or glossy surfaces without placing paper target first
- New product with zero customer reviews makes it harder to verify real-world performance
- Manual calibration feature suggests occasional adjustment may be needed for peak accuracy
This laser measure is the tool you didn't know you needed until you're standing in a furniture store wondering if that sofa will actually fit. It takes the anxiety out of home decorating decisions by giving you exact measurements in seconds, whether you're planning a gallery wall, shopping for window treatments, or figuring out if you can squeeze a bookshelf into that awkward corner.
What sets this apart is the combination of professional accuracy with genuinely useful features. The area and volume modes mean you can calculate paint needs or figure out if your moving boxes will fit in the closet without doing mental math. The Pythagoras function sounds technical but it's incredibly practical when you need to measure height without climbing a ladder or distance across furniture you can't move.
If you want the confidence to make home decor decisions without second-guessing your measurements, this one delivers.
Styles it works with: Modern, Minimalist, Scandinavian, Industrial - any style where precision and clean lines matter
Best placed in: Tool drawer or utility closet with easy access, command center or home office for quick reference during online furniture shopping, garage workshop for DIY projects
May not suit: Renters who rarely rearrange or buy new furniture, homes where someone is already comfortable with traditional tape measures, buyers expecting instant perfection on reflective surfaces like mirrors without the paper target trick
Buy it if:
- You're furnishing a new home or doing a room refresh and need accurate measurements for multiple purchases
- You've ever bought furniture that didn't fit or ordered too much or too little paint, flooring, or wallpaper
- You're planning any renovation work and want to calculate materials costs before committing to the project
- You hate wrestling with floppy tape measures or need measurements in hard-to-reach spaces
Consider waiting if:
- You want to see verified customer reviews before buying since this is a newer model with no ratings yet
Skip it if:
- You only need basic measurements a few times a year and already own a tape measure
- You work primarily with glass, mirrors, or highly reflective surfaces and don't want to use the paper target workaround
Check the latest price and availability on Amazon before it sells out.
The two FastCap tapes both hold 4.7 and differ in function: the Peel & Stick standard tape mounts flat as a fixed reference along a work surface, while the 16-foot Reverse tape is a retractable pull-out with a belt clip and pencil holder for measuring on the move. The two Bosch lasers also both hold 4.7 and differ in range: the GLM165-40 Blaze Pro reaches 165 feet for large jobs, while the GLM100-23 covers 100 feet and runs on two AA batteries for lighter use. The DTAPE laser rounds it out at 4.5 with a backlit display and area and volume modes.
Frequently Asked Questions
How much should outside mount blinds overlap the window?
At least 3 inches on each side, 6 inches total, plus about 3 inches at the top for brackets. More overlap improves light blockage, so go wider on bedroom windows where blackout matters.
Do I add or subtract when measuring for outside mount?
Add. Report the finished size you want, opening plus overlap, since nothing gets deducted. This is the opposite of inside mount, where you report the exact opening and the factory deducts.
How much wall space do I need above the window?
About 2 to 3 inches of flat wall or trim to anchor the top brackets. If that space is tight, the blind may cover part of the glass when mounted, so measure it first.
Should the blind extend past the sill?
For full blackout, yes, a couple inches past the sill. For a trimmer look, stop level with the sill. Decide by whether light control or a clean profile matters more to you.
Why do my outside mount blinds hang crooked?
Almost always an unlevel bracket line. Because the blind hangs on the wall, any tilt in your bracket marks shows. Measure bracket height on both sides and use a level before drilling.
Can I mount outside blinds on drywall alone?
Only with proper wall anchors. A heavy blind pulls out of bare drywall over time. Hit a stud where you can, or use toggle anchors rated for the blind’s weight.
Width or height first when ordering?
Width first, then height, almost universally. A blind listed 36 by 60 means 36 inches wide by 60 tall. Include your overlap in both numbers for an outside mount.
Bottom Line
Outside mount blinds hide a crooked window and block more light, but only if you size the coverage instead of the opening. Add at least 3 inches per side for width, about 3 inches at the top for brackets, and decide the bottom by whether you want blackout or a trim profile. Confirm you have solid mounting surface above the frame and hang the brackets on a level line. Measure the finished size you want, anchor into studs where you can, and the blind covers the window with no light gaps and no tilt.




Write Your Review
No reviews yet. Be the first to share your experience!