

> Editorial Note: I’m Lauren Ro, and I write furniture buying guides. The picks here are judged on the specs that predict how a piece ages — frame joinery, foam density, and load ratings — checked against BIFMA and FSC certifications plus aggregated owner reports.
The mistake that turns a weekend job into a flooded bathroom is skipping the water shutoff and drain disconnect before prying anything loose. Removing a tub is mostly disassembly in the right order, not brute force, and a standard alcove tub weighs 60 to 100 pounds in acrylic or up to 350 in cast iron. Before you start, it helps to know the room: how to clean a bathtub shows what you’re working around, how to unclog a bathtub drain covers the drain assembly you’ll disconnect, how to remove rust from shower handles the corroded fixtures you may hit, how to remove hard water stains from glass applies to any adjacent enclosure, and once the new tub is in, best bath caddy tray and best freestanding bathtub caddy cover the fittings that go back on.
Why Remove a Bathtub, and What to Check First
Most people pull a tub for one of three reasons: it’s cracked and leaking, it’s dated, or they’re converting to a walk-in shower. Check what’s behind and beneath it before you commit. A tub set against studs is a straightforward pull; one tiled into a full surround means demoing the bottom two rows of tile first.
Two things decide how hard this gets: the tub material and whether the drain sits over an accessible crawlspace or a slab. Cast iron is the heavy job, so plan to break it apart in place; acrylic and fiberglass slide out in one piece. Confirm your shutoff valves actually work. Photograph the plumbing layout before you touch it, since that photo is your reassembly map.
Turn Off the Water and Drain the Lines
Kill the water first, always. Shut the bathroom supply valves or the main if the tub has no local shutoffs. Open the tub faucet and let both hot and cold lines bleed out, then leave the faucet open so the lines can’t hold pressure while you work.
Any water left in the trap will spill when you loosen the drain. Sponge out the tub, then keep a bucket and towels under the drain connection. If your P-trap sits below a slab with no access panel, you’ll disconnect at the tub shoe instead. A dry line is a safe line, and it keeps the ASTM-rated PVC joints from cracking when you flex them.
Disconnect the Drain and Overflow Assembly
Start at the drain flange, since it anchors the tub to the plumbing. Unscrew the drain basket with a drain-key or locking pliers, turning counterclockwise. Old metal baskets seize; a few drops of penetrating oil and ten minutes of patience beat stripping the crosshairs.
Behind the tub, at the foot end, sits the overflow cover held by two screws. Remove the faceplate, then the gasket behind it, and separate the shoe and overflow tube from the tub body. On an accessible install this takes ten minutes; on a sealed slab, you cut the pipe below the tub and re-plumb the new connection later. Label each piece as it comes off.
Cut the Caulk and Free the Tub from the Wall
The tub is bonded to the surround with a bead of silicone or acrylic caulk, and that seal is stronger than it looks. Run a utility knife or a dedicated caulk tool along every joint where the tub meets tile or panel. Score both the top edge and any bottom seam. Miss a section and you’ll crack tile trying to lift the tub.
Underneath the caulk, the tub flange is usually screwed or nailed to the wall studs. Pull the bottom row of tile or wall board to expose the flange, then back out the screws or pry the nails. A putty knife slid behind the flange breaks the last of the adhesive grip. Work slowly here, because the wall is what you’re trying not to damage.
Break Down or Slide Out the Tub
Acrylic and fiberglass tubs come out whole. With the drain, flange, and caulk all released, tilt the tub up from the drain end and walk it out. Two people make this safe on stairs. One good tarp under it protects the floor on the way.
Cast iron is the opposite job. At up to 350 pounds, it won’t move in one piece through a doorway. Drape it in a moving blanket to contain shards, put on safety glasses and gloves, and break it apart with a sledgehammer in manageable sections. That’s the standard trade method, faster than three people wrestling deadweight, and you haul the pieces out one at a time, then vacuum every splinter of enamel before the new tub goes in.
What You’ll Need for the Caulk Step
The caulk seal is the one part of this job a specialty tool genuinely speeds up, so that’s where these picks focus. Each is a 3-in-1 or 5-in-1 caulk-and-grout removal tool, with owner ratings that run from 4.1 to 4.4. Reach for one to score the old sealant clean without gouging your tile.
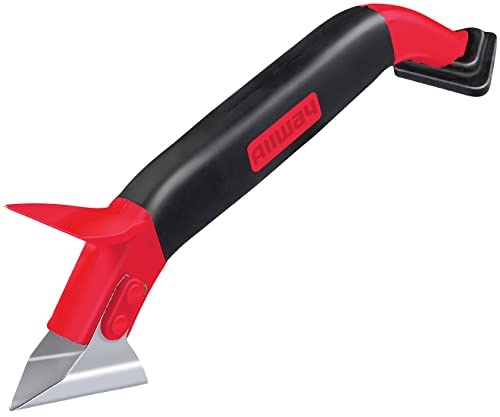
ALLWAY CT31 3-in-1 Caulk Tool - Remove Old Caulk & Smooth New Beads for Bath, Shower & Window Projects
Pros
- Three tools in one design eliminates need for separate purchases
- Stainless steel blade is durable and cuts effectively
- Soft-grip handle is comfortable during extended use
- Works with multiple caulk types for versatile home repairs
- Under $6 price makes it accessible for occasional DIYers
Cons
- No customer reviews available yet to confirm real-world performance
- Plastic construction may not hold up to heavy professional use
- Single blade may need sharpening or replacement over time
If you have ever tried to remove dried caulk with a utility knife or smooth a fresh bead with your finger, you know how frustrating those jobs can be. This little tool solves both problems without adding clutter to your toolbox.
The stainless steel blade makes quick work of old, cracked caulk around tubs and windows, and the rotatable silicone triangle gives you three different bead widths so you can match your project perfectly. The soft-grip handle is a nice touch when you are working on multiple seams.
If you want a simple way to refresh bathroom or window caulk without buying three separate tools, this one delivers.
Styles it works with: Any home style (functional tool, not decorative)
Best placed in: Tool drawer, under bathroom sink, garage workbench, or utility closet for easy access during bathroom refreshes, window sealing projects, or kitchen backsplash touch-ups
May not suit: Professional contractors who need heavy-duty tools for daily use, or homeowners who never do any DIY maintenance work
Buy it if:
- You are planning a bathroom refresh and need to remove old caulk around the tub or shower
- You want to reseal windows or baseboards and need a smooth, professional-looking finish
- You prefer one multi-function tool over buying separate removal and smoothing tools
Consider waiting if:
- You want to see verified customer reviews before purchasing
Skip it if:
- You need industrial-grade tools for heavy daily professional use
- You never do any home maintenance or DIY projects yourself
Check the latest price and availability on Amazon before it sells out.

Saker 3-in-1 Silicone Caulking Tool Kit - Grout Removal & Smoothing Set for Kitchen, Bathroom & Windows
Pros
- Multi-function design replaces several separate tools
- Durable stainless steel blade for tough grout removal
- Silicone pads prevent scratching on delicate surfaces
- No masking tape needed for clean caulk lines
- Compact and easy to store
Cons
- Screws may need adjustment out of the box for optimal feel
- No customer reviews yet to confirm long-term durability
- May require practice to master the smoothing technique
If you've ever tried to remove old caulk with a razor blade or butter knife, you know how tedious it gets. This kit solves that frustration by putting everything you need in one compact tool. The stainless steel scraper cuts through dried silicone without gouging your tile or tub, and the built-in smoother creates clean lines that look professionally done.
What makes this especially useful for home projects is the adjustable tension feature. You can loosen the screws slightly to get a smoother glide, which matters when you're working around a bathtub edge or kitchen backsplash for 20 minutes straight. The silicone pads are gentle enough for glass and porcelain, so you won't accidentally scratch what you're trying to improve.
If you want to refresh caulk lines in your bathroom or kitchen without hiring someone or buying a drawer full of separate tools, this one delivers.
Styles it works with: All styles (this is a functional tool, not decorative)
Best used in: Bathrooms around tubs and showers, kitchens along countertop edges and backsplashes, window frames and sills, laundry rooms near sinks
May not suit: Large-scale commercial projects requiring industrial-grade tools, users who prefer electric caulk removal tools, homes where all caulking is already in perfect condition
Buy it if:
- You're refreshing bathroom or kitchen caulk and want one tool that does everything
- You've struggled with razors or scrapers that scratch surfaces
- You want professional-looking caulk lines without the learning curve of masking tape
Consider waiting if:
- You're waiting for customer reviews to confirm long-term durability
Skip it if:
- You only need to remove caulk once and won't use it again
- You prefer powered tools for faster removal on large areas
Check the latest price and availability on Amazon before it sells out.

Goopreen 5-in-1 Caulking Tool Kit with Stainless Steel Head & 6 Replaceable Pads for Kitchen, Bathroom & Tile Sealing
Pros
- Five functions in one compact tool reduces clutter and simplifies caulking projects
- Six replaceable silicone pads cover most residential gap sizes without buying separate tools
- Stainless steel construction holds up to repeated use in wet environments
- Rated 4.8/5 stars showing strong early customer satisfaction
- Includes sealant cover and multiple scrapers for complete caulk refresh jobs
Cons
- New product with zero written reviews makes it hard to assess long-term durability
- Learning curve to match the right pad size to your specific gap width
- May require multiple passes for thick, aged caulk in older homes
If you have ever tried to scrape out old bathroom caulk with a butter knife or smooth a fresh bead with your finger, you know how frustrating it is to get a clean result. This kit solves that problem by giving you the right tool for every step: a sharp scraper to lift old sealant, a trowel to smooth bumps, and six different radius pads so you can match the exact curve to your gap size. The stainless steel head means it will not rust out after a few months in a damp bathroom, and the compact size fits in a drawer instead of hogging garage shelf space.
What makes this stand out is how it removes the guesswork. Instead of eyeballing whether your caulk line looks professional, you press the pad into the wet bead and get a consistent, smooth finish every time. It is especially helpful around kitchen sinks, tub edges, and tile joints where uneven lines are obvious and hard to fix once the caulk dries.
If you want clean, professional-looking seals without paying a handyman every time your bathroom caulk starts peeling, this one delivers.
Styles it works with: This is a functional tool, not decor, so it suits any home style from Modern Farmhouse to Contemporary as long as you have caulked seams that need maintenance.
Best placed in: Tool drawer in the kitchen, under bathroom sink cabinet, or garage workbench for easy access during home maintenance projects.
May not suit: Renters who are not allowed to alter caulking, or homes where all sealing work is handled by property management or contractors.
Buy it if:
- You have peeling or moldy caulk around your tub, sink, or tile that you want to replace yourself
- You are tired of uneven caulk lines that look amateur even after multiple tries
- You want one tool that handles both removal and finishing instead of buying separate scrapers and smoothers
Consider waiting if:
- You need to see more long-term reviews since this is a newer product with no written feedback yet
Skip it if:
- You only have one small caulking job and would rather hire someone than learn a new tool
- You already own dedicated caulk removal and smoothing tools that work well for you
Check the latest price and availability on Amazon before it sells out.

Pros
- Includes remover tool and finishing tools in one affordable kit
- 5 radius options cover most household caulking needs
- Silicone pads are reusable and easy to clean
- Works with multiple caulk types (latex, silicone, acrylic)
- Non-slip button makes switching pads quick
Cons
- No customer reviews yet to confirm long-term durability
- May require practice to achieve perfectly smooth lines on first use
- Instructions could be clearer for beginners
This kit takes the guesswork out of caulking by giving you the exact tools professionals use, all in one affordable package. The 4-in-1 finishing tool with swappable silicone pads means you are not stuck with one radius that never quite fits your baseboards or tub edges. Switch from a tight 3R corner to a wider 17R radius in seconds, and the non-slip button makes it feel intuitive even if you have never caulked before.
The built-in remover is a game-changer for refreshing old bathroom grout or peeling window seals. Instead of scraping with a knife and risking damage to tile or wood, this tool lifts old caulk cleanly so your new bead adheres properly. The silicone pads wipe clean with a damp cloth and hold up through multiple projects, which means this $6.95 kit can handle every caulking job in your house for years.
If you want clean, finished caulk lines in your bathroom or kitchen without paying a handyman, this kit delivers.
Styles it works with: Any style (this is a functional tool, not decor)
Best placed in: Bathroom showers and tubs, kitchen backsplash edges, window frames, baseboards, sink perimeters
May not suit: Renters who cannot make permanent repairs, homes where all caulking is already in perfect condition, users who prefer pre-mixed caulk strips over traditional tubes
Buy it if:
- You have peeling or discolored caulk around your tub, sink, or windows that needs replacing
- You want to tackle small sealing projects yourself instead of hiring someone
- You are renovating a bathroom or kitchen and need clean caulk lines on tile, counters, or fixtures
Consider waiting if:
- You need to see verified customer reviews before committing (this product has zero reviews currently)
Skip it if:
- You only need to caulk once and would rather buy a disposable applicator
- You already own a caulking toolset that works well for your needs
Check the latest price and availability on Amazon before it sells out.

Pros
- Combines scraper, trowel, and smoother in one tool to reduce clutter
- Sharp stainless steel blade handles tough old caulk removal
- No masking tape required, speeds up the sealing process
- Lightweight and easy to maneuver in bathrooms and kitchens
- Affordable price point for a multi-function caulking tool
Cons
- Plastic end may wear down on cement or very hard surfaces
- Requires manual adjustment of screws to find the right glide tension
- Limited reviews make long-term durability harder to assess
This little tool solves one of the most frustrating parts of home maintenance: getting clean, professional caulk lines without spending an hour taping off surfaces. The Saker 3-in-1 does the scraping, smoothing, and finishing in one pass, which means your bathroom or kitchen refresh takes half the time.
The stainless steel scraper is sharp enough to dig out old, dried caulk without damaging tile or grout, and the silicone pads glide smoothly to create those crisp lines you normally only get from a pro. It fits easily in one hand, so you have better control around sinks, tubs, and window frames where precision matters.
If you want clean caulk lines without the tedious prep work of masking tape, this one delivers.
Styles it works with: Modern, Farmhouse, Minimalist, Traditional (universal tool for any interior style)
Best placed in: Bathroom vanity storage, kitchen utility drawer, garage tool organizer
May not suit: Commercial contractors who need heavy-duty grout removal equipment, or homes where the plastic end would be used frequently on concrete or masonry surfaces
Buy it if:
- You are resealing a bathroom, kitchen backsplash, or window and want pro results without hiring help
- You hate the mess and time spent applying and removing masking tape
- You need a compact, easy-to-store tool that handles multiple caulking tasks
Consider waiting if:
- You need to see more long-term durability reviews before committing
Skip it if:
- You primarily work on cement, brick, or very rough surfaces where the plastic end will wear quickly
- You need a powered grout removal tool for large-scale tile projects
Check the latest price and availability on Amazon before it sells out.
The ALLWAY CT31 leads the group at a 4.4 rating and keeps it simple as a 3-in-1 remover-and-applicator. The Goopreen is the do-everything pick, a 5-in-1 with a stainless steel head and 6 replaceable pads for finishing fresh beads, though its 4.2 rating signals more unit-to-unit variation than the ALLWAY. The two Saker tools differ by contents, not design: the Black Blue version is a full kit with extra scraper heads at a 4.3 rating, while the Classic Black is the pared-down single tool at 4.1, the lowest here and the one to skip if the kit price is close. The King&Charles rounds out the set at 4.2 as another 3-in-1 remover.
Frequently Asked Questions
Do I need to shut off the whole house water supply?
No. If the bathroom has working local shutoff valves, use those and leave the rest of the house running. Only kill the main if the tub lacks its own valves or the local ones won’t fully close.
Can one person remove a bathtub alone?
It depends on the material. A 60-pound acrylic tub is a solo job with care. Cast iron at up to 350 pounds is not; break it apart in place, or get a second person before you attempt to move it whole.
How do I remove a cast iron tub without wrecking the floor?
Cover it with a moving blanket to trap shards, wear glasses and gloves, and break it into sections with a sledgehammer. Lay a tarp down first, then vacuum every enamel splinter before anything new goes in.
What tools cut old caulk fastest?
A utility knife works, but a dedicated 3-in-1 or 5-in-1 caulk tool scores the seal cleaner and protects the tile edge. The picks above all handle silicone and acrylic caulk without gouging the surround.
Do I have to remove tile to get the tub out?
Usually the bottom row or two. The tub flange is screwed or nailed behind the wall board, so you’ll expose it by pulling the lowest tile course. A fully tiled-in surround needs more demo than a paneled one.
What’s behind the tub faceplate near the faucet?
That’s the overflow assembly: a cover plate, two screws, a gasket, and the overflow tube feeding the drain. Remove the plate and gasket, then separate the tube before you try to lift the tub free.
Is removing a bathtub a DIY job or a plumber’s?
It depends on the plumbing access. An accessible drain over a crawlspace is a solid DIY project. A drain buried under a slab, or any move of a cast iron tub, is where a pro saves you a cracked pipe or a hurt back.
Bottom Line
For most acrylic or fiberglass tubs, this is a real DIY job: shut off and drain the water, disconnect the drain and overflow, cut every caulk seam, back out the flange fasteners, and walk the tub out. A dedicated caulk tool is the one purchase that earns its place at the sealant step. Stop and call a plumber if the drain sits under a slab with no access, or if you’re facing cast iron and can’t safely break it apart. Order beats force every time.


Write Your Review
No reviews yet. Be the first to share your experience!