

> Editorial Note: I’m Lauren Ro, and I write furniture buying guides. The picks here are judged on the specs that predict how a piece ages — frame joinery, foam density, and load ratings — checked against BIFMA and FSC certifications plus aggregated owner reports.
The single mistake that ruins most peel-and-stick jobs happens before the first tile goes down: sticking it to a floor that isn’t clean, dry, and flat. Get the base right and the adhesive does its job for years. Skip it and you’ll be lifting curled corners by month three, whether you’re covering a rental kitchen with best peel and stick floor tile bathroom logic, comparing the look against ceramic vs porcelain tile, or borrowing the renter-friendly trick behind best peel and stick wallpaper for renters. Here’s the order that actually works, from prep through the final roll, plus how it ties into how to clean a vinyl floor, how to clean bathroom tile, and the design cues in shower tile ideas.
What You Can Stick It To (and What You Can’t)
Peel-and-stick vinyl bonds to a hard, smooth, dry surface and almost nothing else. Existing vinyl, sealed concrete, plywood underlayment, and old ceramic with tight grout lines all work. Textured tile, carpet, unsealed concrete, and floating laminate don’t, because the adhesive needs continuous contact to grip.
Clean matters more than people expect. Sweep, then mop with a degreaser and let it dry fully, since any dust or wax film sits between the glue and the floor and breaks the bond. A trick worth borrowing from how to clean a vinyl floor: skip oil-based cleaners entirely before installing.
Flatness is the last check. Fill dips deeper than 1/8 inch with a leveling compound and sand down high spots. Grout lines wider than 1/8 inch telegraph through thin tile within weeks, so a plywood or hardboard underlayment over rough ceramic is cheaper than redoing the whole floor.
Plan the Layout From the Center Out
Start from the center of the room, not a wall, so your border tiles come out even on both sides. Snap two chalk lines that cross at the room’s midpoint at a 90-degree angle, and check them with a framing square before you commit.
Dry-lay a row in each direction first. If the last tile against a wall would land under 2 inches wide, shift your center line half a tile so both ends get a fuller cut. Thin slivers along a baseboard look unfinished and pop loose faster because they carry less adhesive.
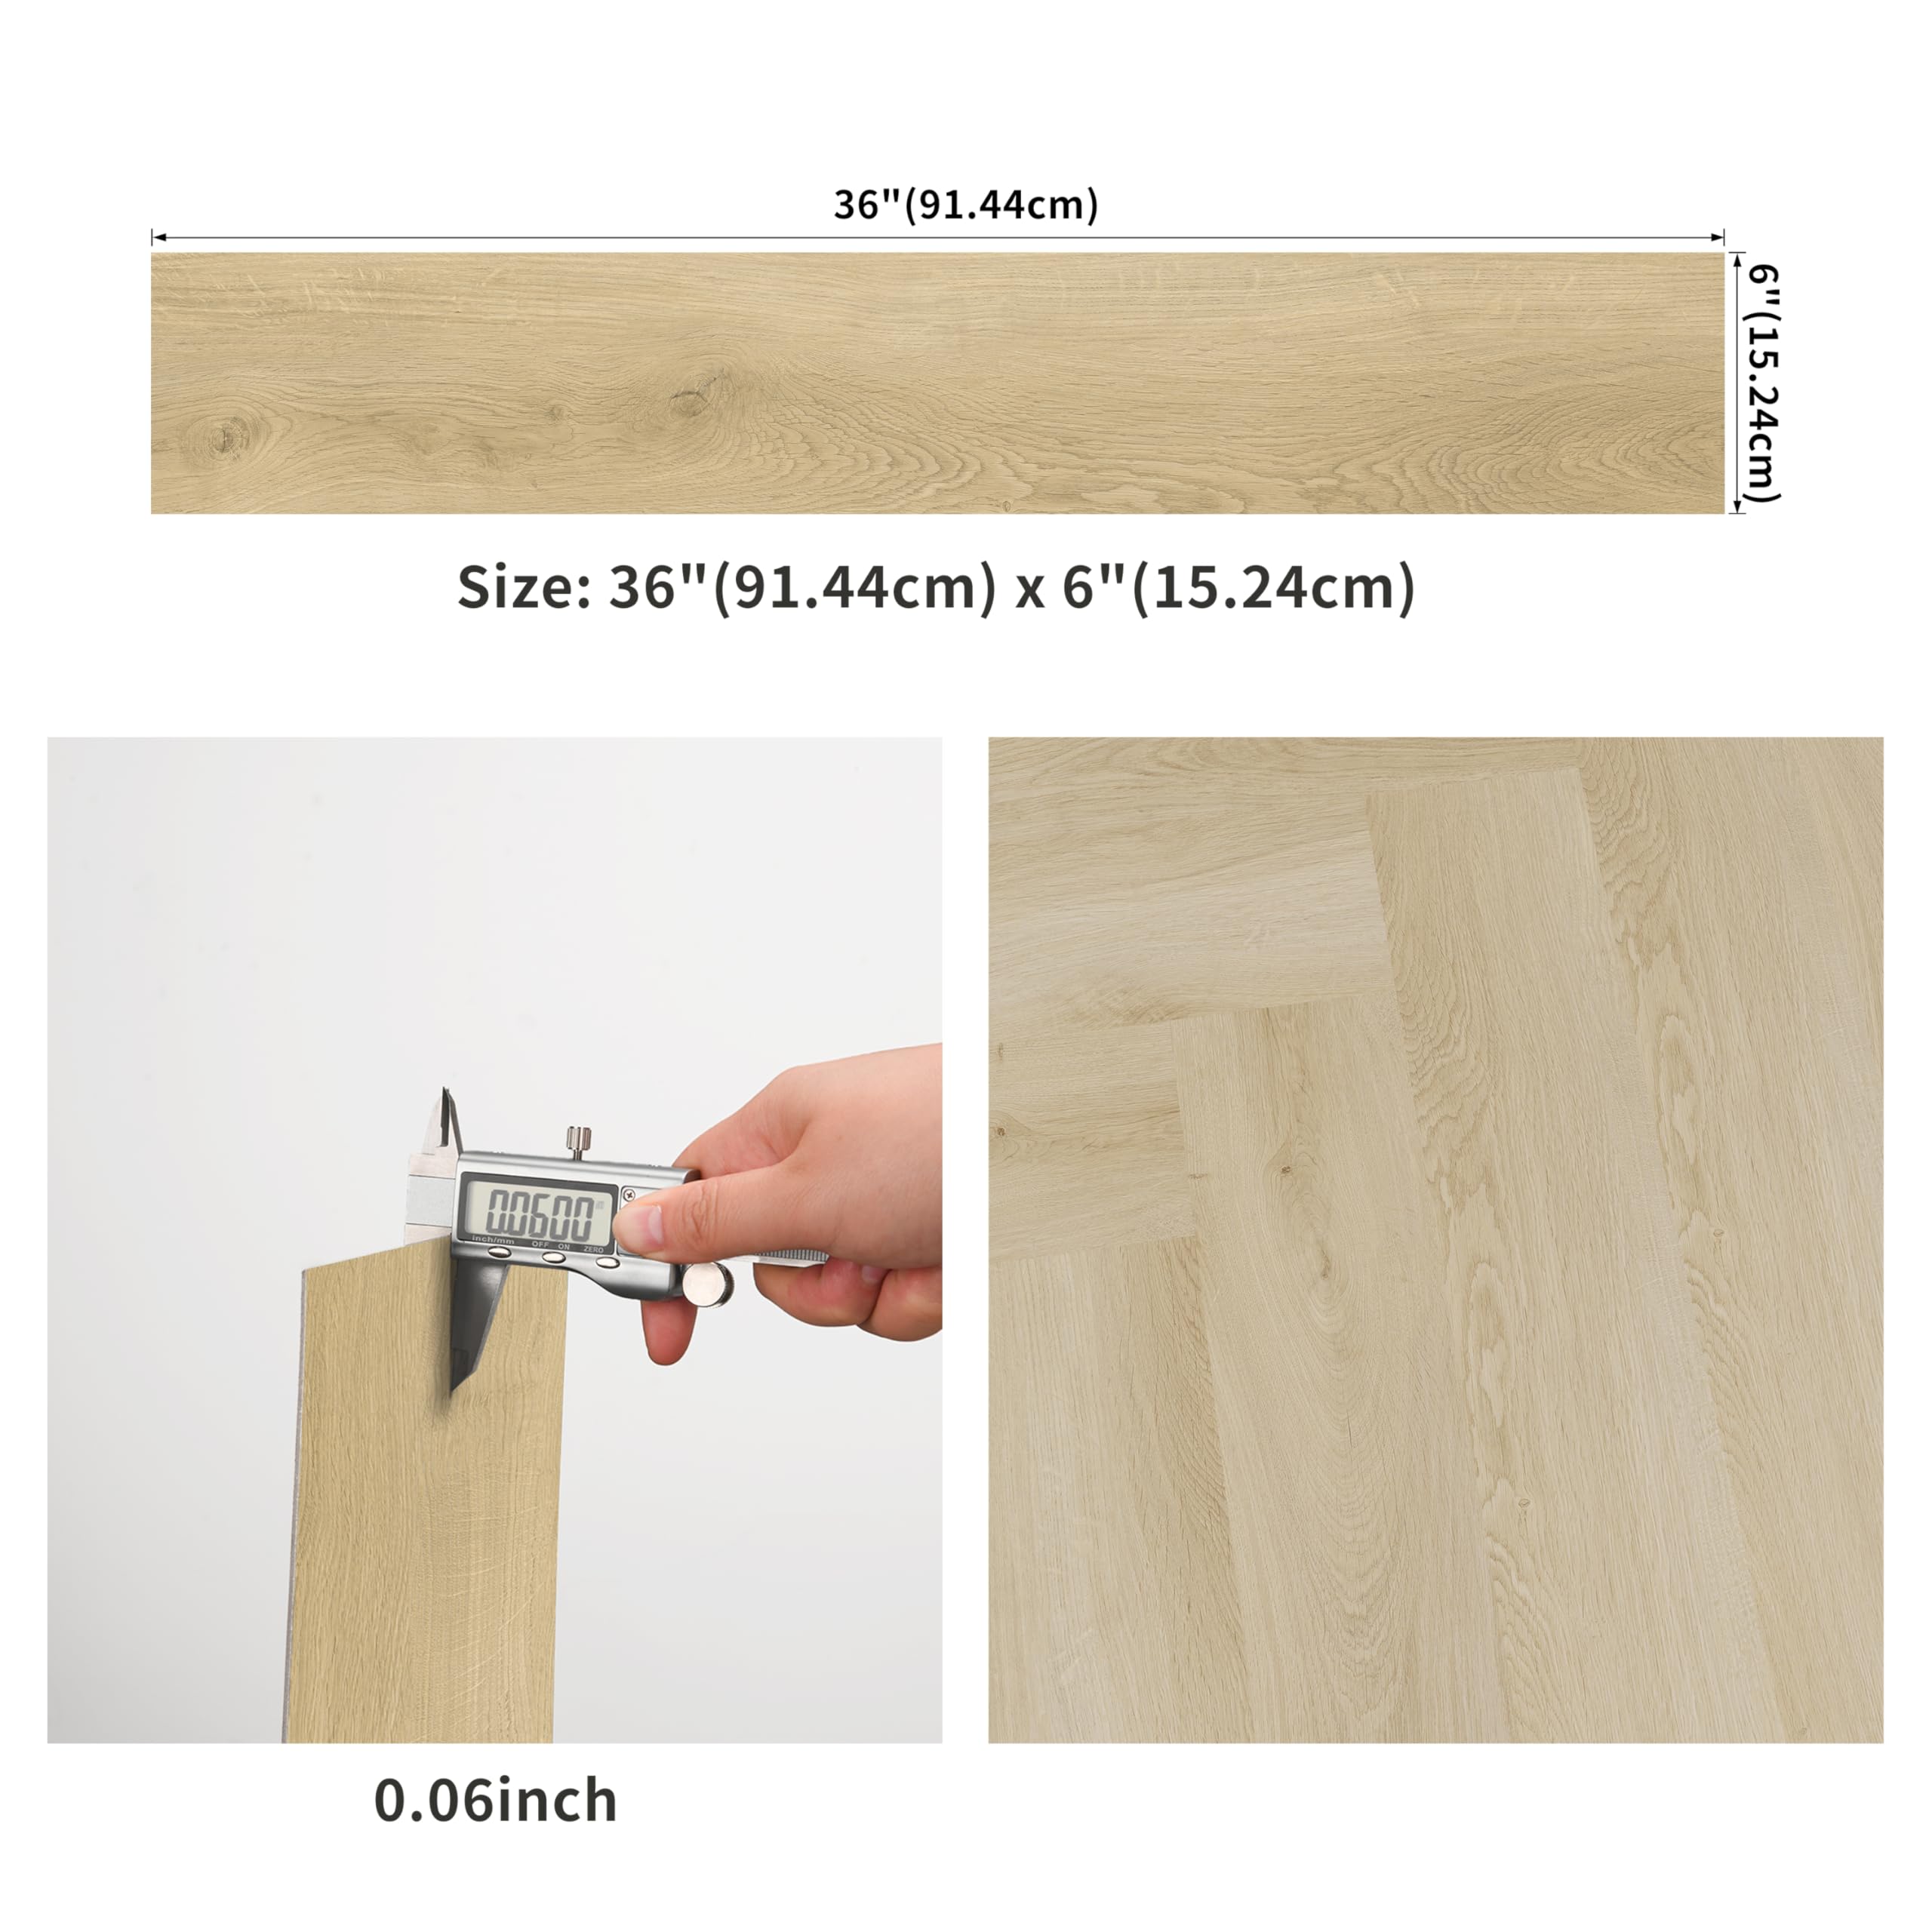
Layout also depends on tile shape. Square formats like the ZRJT 12-by-12 marble or the FloorPops Bonneville Beige 12-by-12 lay in a simple grid off the center cross. Plank formats like the MULGREAT 36-by-6 want a running brick pattern, with each row offset by a third so the short seams never line up. Decide the pattern before you peel a single backing sheet.
Peel, Place, and Press (Temperature Decides Whether It Sticks)
Room temperature controls the adhesive, so this step comes with a number: keep the space between 65 and 85 degrees for at least 48 hours before, during, and after installing. Cold glue won’t tack; hot glue oozes and shifts. Let the sealed boxes acclimate flat in the room for two days first.
Work one quadrant at a time toward the walls. Peel the backing, line the tile edge to your chalk line, and set it down without sliding it, because dragging smears adhesive ahead of the tile and weakens the grip. Butt each tile tight against its neighbor with no gap.
Press as you go. Hand pressure seats it enough to reposition within the first minute, but firm the whole tile down with a rolling pin or a J-roller before moving on. That’s the difference between a tile that stays and one that lifts.

Cutting Tiles for Walls and Door Frames
Most peel-and-stick vinyl cuts with a utility knife and a straightedge, no wet saw needed. Score the face deep along a metal ruler, then snap the tile back and slice the paper backing. Two or three passes beat one heavy stroke.
Border tiles against a straight wall are simple. Set a loose tile squarely on the last full one, put a second tile against the wall as a spacer, and mark where it overlaps. That gives you a clean straight cut sized to the gap, minus a 1/8-inch expansion allowance.
Door frames and jambs need an L-shaped or notched cut. Make a paper template of the profile, trace it onto the tile, and cut the inside corner first with the knife tip so the two straight scores meet cleanly. For tight curves around a pipe or register, warm the vinyl slightly with a hair dryer so it flexes instead of cracking.

Roll the Whole Floor to Lock It Down
Once every tile is set, roll the entire floor to bond the adhesive fully. A 75- to 100-pound floor roller, rented from most hardware stores, is the standard tool, but a heavy kitchen rolling pin works for a small bathroom or entry. Roll in both directions across every seam.
Then leave it alone. Adhesive reaches full cure over 24 to 72 hours, so keep foot traffic light and hold off on heavy furniture or a mop for at least a day. Rushing the cure is the second most common reason edges lift. The roll and the wait are what turn a floor that looks done into one that stays done.
What You’ll Need
The tiles below all clear a 4.1 owner rating and cover the formats this job uses, from wood-look planks to square stone and marble looks. Match the format to your layout plan: planks for a running pattern, squares for a grid.

Pros
- Thicker 1.5mm construction resists scratches and daily wear better than budget options
- Deep embossed texture provides realistic wood grain look and feel underfoot
- No adhesive mess or floor damage - ideal for renters who need their deposit back
- Long 36-inch planks create fewer seams for a more authentic hardwood appearance
- Waterproof design works in kitchens, bathrooms, and other moisture-prone areas
Cons
- No customer reviews yet to verify real-world durability and installation ease
- May show seams more visibly than professional installation methods
- Adhesive strength depends heavily on floor prep and surface smoothness
This flooring gives you a legitimate hardwood alternative without the price tag or installation headaches. The Blayney Oak finish has that sought-after weathered wood look that works with almost any decor style, and the embossed texture means it actually feels like wood underfoot instead of flat plastic.
What sets this apart from cheaper peel-and-stick options is the 1.5mm thickness. That extra material makes a noticeable difference in how substantial it feels when you walk on it, and it holds up better against chair legs, pet claws, and dropped items. The 36-inch plank length also means fewer seams, so your floor looks more like real hardwood and less like obvious vinyl tiles.
If you want a rental-friendly floor upgrade that looks convincing in photos and feels solid in person, this one delivers.
Styles it works with: Modern Farmhouse, Rustic, Scandinavian, Coastal
Best placed in: Bedrooms, kitchens, RVs and campers, laundry rooms, basement living spaces
May not suit: High-traffic commercial spaces, homes where you plan to stay long-term and could invest in permanent flooring, rooms with severely uneven subfloors that would show through thin vinyl
Buy it if:
- You rent and need a flooring upgrade you can remove without losing your security deposit
- You want to refresh an outdated floor over a weekend without hiring contractors
- You need waterproof flooring for a kitchen, bathroom, or laundry area
- You are renovating an RV or camper and need lightweight, easy-install flooring
Consider waiting if:
- You want to see verified customer photos and reviews before committing to a new product
- You are waiting for a sale price on flooring materials
Skip it if:
- You own your home and can invest in professional hardwood or luxury vinyl plank installation
- You need flooring rated for heavy commercial foot traffic
- Your subfloor has significant damage or unevenness that needs correction first
Check the latest price and availability on Amazon before it sells out.

FloorPops x Chris Loves Julia Bonneville Beige Peel and Stick Floor Tiles 12x12 Marble Checkerboard Pattern
Pros
- No special tools or adhesive required for most surfaces, making it a true weekend project
- Water-resistant material holds up in splash-prone areas like kitchens and bathrooms
- Designer-curated marble checkerboard pattern looks more expensive than it is
- Washable surface simplifies ongoing maintenance
- Each pack covers about 10 square feet, making it easy to buy exactly what you need
Cons
- Requires a separate primer adhesive if installing over concrete subfloors
- Thin 0.06-inch depth may telegraph imperfections in uneven or damaged subfloors
- Color may appear slightly different in person compared to online product photos
There is something satisfying about a floor that looks like it took a full renovation but actually went down in an afternoon. The Bonneville Beige tiles from FloorPops x Chris Loves Julia deliver that exact feeling. The beige and white marble checkerboard pattern is soft enough to feel timeless without vering into stark or sterile territory.
In a real room, these tiles read as intentional and polished. They have a textured, low-lustre surface that avoids the cheap plastic shine you sometimes get with peel-and-stick products. The neutral palette plays nicely alongside wood cabinets, white trim, or even bold wall colors, letting the floor anchor the space without competing for attention.
If you want a designer-look floor update without the mess, cost, or commitment of traditional tile, this one delivers.
Styles it works with: Modern Farmhouse, Transitional, Classic Traditional, Coastal Casual
Best placed in: Kitchen floor, laundry room, half bathroom, mudroom or entryway
May not suit: Rooms with uneven or heavily damaged subfloors that could telegraph through the thin vinyl, or concrete surfaces unless you are willing to apply a primer adhesive first
Buy it if:
- You want a quick, renter-friendly floor refresh that does not require professional installation
- You love the marble checkerboard look but cannot justify the cost or labor of real stone tile
- You need water-resistant floring for a bathroom, kitchen, or laundry room
Consider waiting if:
- You need to cover a concrete subfloor and have not yet sourced the required primer adhesive
- You are unsure about the color and want to order a single pack to test in your lighting first
Skip it if:
- Your subfloor has significant dips or damage that a0.06-inch tile cannot hide
- You prefer a thicker, more rigid vinyl plank with built-in underlayment for high-traffic main living areas
Check the latest price and availability on Amazon before it sells out.

MORCART Peel and Stick Floor Tile 20PCS Blue White Vinyl Flooring 7.87x7.87in Waterproof DIY 8.6 sqft Coverage
Pros
- True peel and stick application requires no additional adhesive or tools
- Waterproof construction works well in bathrooms and laundry areas
- Can be cut with regular scissors for custom fitting around corners and fixtures
- Affordable price point for experimenting with temporary floor updates
- Non-slip surface adds safety in moisture-prone spaces
Cons
- Zero customer reviews make it difficult to verify long-term durability claims
- 7.87 inch tile size means more seams compared to larger format options
- May not adhere well to textured or uneven surfaces without extensive prep
If you have been staring at that tired bathroom floor or dated laundry room tile, these MORCART peel and stick tiles offer a low-commitment refresh that does not require ripping up existing floors. The blue and white pattern brings a classic, clean look that works whether you are going for coastal vibes or simply want something brighter than builder-grade beige.
What makes these particularly appealing for renters or first-time DIYers is the genuine simplicity. You are not mixing grout, waiting for adhesive to cure, or calling in favors from handy friends. Peel off the backing, press it down on a clean surface, and trim edges with kitchen scissors if needed. The waterproof and non-slip features mean you can use them in the exact spots where regular flooring struggles, like around the toilet or in front of the washing machine.
If you want a bathroom or laundry refresh that you can knock out in an afternoon without renting tools or hiring help, this one delivers.
Styles it works with: Coastal, Farmhouse, Mediterranean, Traditional
Best placed in: Small bathrooms, laundry rooms, mudroom entryways, pet feeding stations, powder rooms
May not suit: Large open-plan spaces where seams will be highly visible, homes with radiant floor heating, textured or damaged subfloors that need leveling first
Buy it if:
- You are renting and need a temporary floor solution that comes up cleanly when you move
- You have a small bathroom or laundry area under 10 square feet that needs a quick cosmetic update
- You want to test out peel and stick flooring before committing to a larger, pricier project
- You need waterproof flooring around a washing machine, pet area, or utility sink
Consider waiting if:
- You want to see verified customer photos and durability feedback before buying
- You prefer larger format tiles with fewer visible seams
Skip it if:
- You are covering a high-traffic hallway or living space where durability is critical
- Your subfloor has texture, cracks, or unevenness that will telegraph through thin vinyl
- You need flooring that stands up to furniture legs and heavy appliances without denting
Check the latest price and availability on Amazon before it sells out.

Pros
- No special tools or grout required for installation
- Water-resistant and washable for kitchen and bathroom use
- Textured finish mimics real stone convincingly
- Removable without damaging subfloor, ideal for renters
Cons
- Only 10 square feet per package means larger rooms require multiple orders
- New product with zero customer reviews to validate durability claims
- Thin 0.06-inch profile may telegraph subfloor imperfections
FloorPops Raven tiles give you the drama of black stone floors without the back-breaking installation or permanent commitment. The textured finish catches light naturally, and because each tile has slight pattern variations, your floor looks authentically laid rather than stamped from a single mold.
We appreciate how the peel-and-stick format respects your time. No waiting for grout to cure, no cutting with wet saws, no contractor quotes. You can tackle a small bathroom on a Saturday morning. The water-resistant surface means you can mop normally and handle the inevitable kitchen spills without paranoia.
If you want a bold floor update that you can install yourself in one weekend without ripping out existing flooring, this one delivers.
Styles it works with: Modern Industrial, Minimalist, Contemporary, Scandinavian with dark accents
Best placed in: Powder rooms, small entryways, laundry rooms, kitchen backsplash accent walls repurposed as floor, mudrooms
May not suit: Homes with very uneven subfloors (the thin profile will show every dip and bump), high-traffic commercial spaces, or anyone seeking warm, cozy flooring tones
Buy it if:
- You rent and want a dramatic floor change you can take with you
- Your bathroom or entryway is under 50 square feet and needs a quick refresh
- You have a smooth, clean subfloor and want to avoid demolition mess
Consider waiting if:
- You need to see real customer photos and durability feedback before committing to a larger space
Skip it if:
- Your subfloor has significant dips, cracks, or texture that will telegraph through thin vinyl
- You need flooring for a space larger than 100 square feet without ordering many boxes
Check the latest price and availability on Amazon before it sells out.

Pros
- Budget-friendly at under $1 per square foot
- No special tools or skills required for installation
- Waterproof construction works in high-moisture areas
- Thick enough to cover minor surface flaws
- Realistic marble texture looks more expensive than price suggests
Cons
- New product with no verified customer reviews yet
- May not hold up as well as traditional flooring in high-traffic areas
- Limited to 40 square feet per pack, larger rooms need multiple orders
This is the kind of flooring that makes sense when you need a quick refresh without the commitment or cost of permanent installation. The black marble pattern reads surprisingly upscale for peel-and-stick tiles, and the 0.05-inch thickness means they can hide those annoying dips and scratches in your existing floor that would otherwise show through thinner options.
What stands out is the waterproof layer, which actually matters in real life. Spill your coffee in the kitchen or deal with bathroom splashes, and these tiles handle it without peeling up at the corners like cheaper versions tend to do. The strong adhesive is key here, it stays down even when moisture gets involved.
If you want a fast flooring fix that looks intentional (not like a temporary patch job) without hiring anyone or renting equipment, this one delivers.
Styles it works with: Modern, Contemporary, Industrial, Minimalist
Best placed in: Bathroom floors, kitchen accent areas, laundry room, RV interiors, rental apartment updates
May not suit: Homes needing more than 40 square feet in one space without visible seams, traditional or farmhouse decor styles that call for warmer wood tones, high-traffic entryways where long-term durability is critical
Buy it if:
- You are renting and need a removable flooring upgrade
- Your bathroom or kitchen floor is dated but the budget does not allow for full renovation
- You want a DIY project you can finish in one afternoon without power tools
Consider waiting if:
- You need to see customer photos and long-term durability reviews first
- You are comparing multiple marble pattern options and want to confirm this exact shade
Skip it if:
- You need flooring for spaces larger than 40 square feet and want seamless coverage
- You prefer warm wood tones or lighter marble colors instead of black
Check the latest price and availability on Amazon before it sells out.
The MULGREAT set covers 54 square feet across 36 planks in a 36-by-6 wood-look format at 1.5mm thick, and its 4.4 rating is the highest here. The two FloorPops options differ by look and use: the Chris Loves Julia Bonneville Beige is a 12-by-12 designer beige square at 4.3, while the FloorPops Raven is a removable black stone look aimed at kitchens and entryways at 4.2. The MORCART 20-piece set runs a smaller 7.87-by-7.87 square at 4.2, and the ZRJT 40-pack is a 12-by-12 black vein marble covering 40 square feet at 4.1, the lowest rating of the group, which usually signals more unit-to-unit variation worth inspecting on arrival.
Frequently Asked Questions
Do I need underlayment for peel and stick vinyl tile?
It depends on the existing floor. Over smooth, sealed subfloor you don’t. Over rough ceramic or a floor with grout lines wider than 1/8 inch, add a plywood or hardboard underlayment so ridges don’t telegraph through the thin vinyl.
Can I install peel and stick tile over existing tile?
Yes, if the old tile is sound, clean, and flat. Fill grout lines and any chips first, since gaps deeper than 1/8 inch show through and collect stress. Textured or loose tile needs an underlayment layer before you start.
How long does peel and stick vinyl flooring last?
It depends on prep and traffic. A well-bonded floor in a low-traffic room can hold up for years, while a rushed install over dusty or uneven subfloor may lift within months. Clean, dry, flat base does more for lifespan than the tile brand.
Do I need to leave an expansion gap?
Yes. Leave about 1/8 inch at every wall and fixed object so the vinyl can move with temperature swings without buckling. Baseboard or quarter-round trim covers the gap. Skipping it is a common cause of tenting at seams.
What temperature does the room need to be?
Keep it between 65 and 85 degrees for 48 hours before, during, and after installing. Cold slows the adhesive so tiles won’t tack, and heat softens it so they shift. Let the boxes acclimate flat in the room first.
Can I use peel and stick tile in a bathroom or kitchen?
Yes, with limits. Waterproof-rated tiles like the MULGREAT and ZRJT handle splashes, but standing water at seams still creeps under and lifts edges over time. For a full bathroom setup, weigh sealed grout options and see best peel and stick floor tile bathroom.
Do I have to roll the floor after installing?
Yes. Rolling with a 75- to 100-pound roller or a heavy rolling pin presses out air and seats the adhesive across every seam. Hand pressure alone leaves weak spots that lift first. It’s the step most rushed jobs skip.
Bottom Line
Peel-and-stick vinyl succeeds or fails on the base, not the brand. A clean, dry, flat surface, a center-out layout, a room held at 65 to 85 degrees, and a firm roll at the end handle almost every install without a curled corner later. If your subfloor is unsealed concrete, actively damp, or off-level by more than 1/8 inch across a few feet, stop and fix that first or call a flooring pro. Prep is 80 percent of the job, and the tiles are the easy part.

Write Your Review
No reviews yet. Be the first to share your experience!