

> Editorial Note: I’m Erin Schwartz, and I cover home decor with a bias toward what actually works in a real room. The guidance here weighs scale, layout, and materials against Apartment Therapy and Wirecutter coverage rather than styling a space that nobody lives in.
A recessed cabinet sits inside the wall instead of bolting to the surface, so it gains you two to four inches of clearance over a vanity where every inch counts. The catch is that you’re cutting into drywall and possibly rerouting a wire, which is why most people stall on the planning, not the labor. If you’re still deciding on the unit itself, our guides to the recessed medicine cabinet with mirror, the in wall medicine cabinet, and the best medicine cabinet cover the fit-and-finish choices, while small medicine cabinet and medicine cabinet with mirror and lights narrow it by size and feature. Once it’s mounted, how to organize a medicine cabinet handles the part that actually keeps the counter clear.
What to Check Before You Cut Into the Wall
The single decision that makes or breaks a recessed install happens before any tool comes out: what’s behind the drywall. Interior walls in most homes are framed with studs spaced 16 inches on center, so a standard 14- to 16-inch-wide cabinet drops neatly into one stud bay without cutting a stud. Exterior walls are the trap. They carry insulation, and often a vent stack or wiring, and you don’t cut into one without knowing what runs through it.

Pull the cabinet’s rough-opening dimensions from its manual and confirm the space works around the sink. Apartment Therapy’s small-bath coverage puts the mirror’s center near 60 inches off the floor for an average household, though you should set it to the tallest daily user. Kill the power to the bathroom circuit at the breaker before you open anything, because switch and outlet wiring often runs at mirror height. A stud finder with AC detection flags live wires and framing in one pass.
Tools and Materials for the Job
You don’t need a contractor’s kit for this. A stud finder, a level, a tape measure, a drywall saw, a drill/driver, and a utility knife cover the cutting and mounting. Add 2×4 offcuts for blocking, 2.5- to 3-inch wood screws, and shims to square the box in the opening.
Keep a pencil, a framing square, and a small pry bar within reach. The pry bar matters more than people expect: it’s what lets you free a stubborn drywall section without tearing the paper on the surrounding wall. Safety glasses and a dust mask aren’t optional once the saw goes in.
Mark the Studs and Outline the Opening
Find the studs on either side of your planned location and mark their inside edges. That gap is your working width, and your cabinet’s rough opening has to fit inside it or land against one stud you’ll build off of. Hold the cabinet body to the wall, level it, and trace the outline in pencil.
Before you commit to that line, cut a small inspection hole inside the outline and look in with a flashlight. You’re confirming the bay is clear of pipes, ducts, and wiring. If a wire crosses the zone, stop and reroute it or shift the cabinet a bay over. This five-minute check is the difference between a clean job and an emergency call.
Cut the Drywall and Add Blocking
Score the outline with a utility knife first, then cut through the drywall with the drywall saw, staying just inside your pencil line. Cut slowly where the opening meets a stud so you don’t bite into the framing. Once the panel drops out, you’ll see the stud bay and the back of the opposite wall.
Recessed cabinets need something solid to screw into at the top and bottom, and an open bay gives you nothing there. That’s where blocking comes in. Cut two 2×4 pieces to fit horizontally between the studs, position them at the cabinet’s top and bottom mounting points, and screw them through the studs at an angle or with pocket screws. This Old House frames blocking as the step DIYers skip and regret, because a cabinet anchored only to drywall works loose within a season.
Set the Cabinet and Finish the Edges
Slide the box into the opening and rest it on the bottom blocking. Level it in both directions, then shim any gaps between the cabinet flange and the framing so the frame sits flat and square. A cabinet that’s out of level reads instantly once the mirror door swings and won’t stay closed.
Drive screws through the cabinet’s side flanges into the studs and blocking, checking the level again after the first two screws bite. If your unit has a trim flange, it hides the cut edge; if it doesn’t, a bead of paintable caulk closes the seam between the frame and the wall. Hang the mirror door, adjust the hinges so the gap is even, and load the shelves. That’s the whole job.
Helpful Products
The three cabinets below are recessed, mirrored units that carry strong owner ratings, and each states its own size in the title so you can match it to a standard stud bay before you cut. I’ve kept the criteria simple: a 4.5-star rating or better, a beveled or framed mirror front, and a footprint that fits common bathroom layouts. Start with the 16×24 options if you want a taller mirror; drop to the 14×18 if your bay or sink clearance is tight.

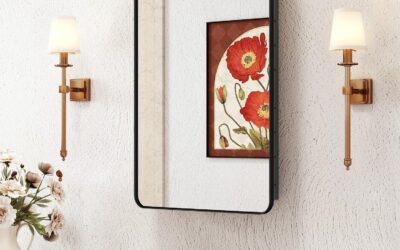
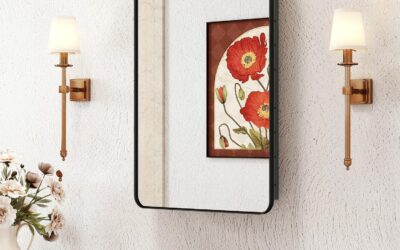
Venlus 16x24 Matte Black Medicine Cabinet with Mirror - Recessed or Surface Mount, Pre-Assembled, Reversible Door
Pros
- Pre-assembled design saves 30-60 minutes of frustrating setup
- High rating of 4.6 stars from 103 reviews suggests reliable quality
- Aluminum body won't warp, peel, or corrode in humid bathroom conditions
- Reversible door and dual installation options fit almost any bathroom layout
- Lead-free, eco-friendly glass is safer and more environmentally responsible
Cons
- Only 2.9 inches deep, so it won't hold wide product containers or multiple rows of items
- Recessed installation requires a 3.3-inch wall cavity, which may not exist in all bathrooms
- Matte black finish shows water spots and fingerprints more easily than white or silver
This Venlus cabinet solves one of the most annoying parts of bathroom upgrades: the assembly process. It shows up at your door fully put together, which means you can focus on the installation itself instead of wrestling with tiny hinges and misaligned shelves. The matte black finish looks sharp against white subway tile or marble countertops, and the magnetic closure gives it a quality feel that cheaper cabinets lack.
The reversible door is a smart touch for real-world bathrooms where the light switch or towel bar determines which way your cabinet needs to swing. You're not locked into a left-hand or right-hand model, so you can adjust on install day without returns or exchanges. The aluminum body handles steam and splashes without the warping or peeling issues you'd get from particle board or cheap metal.
If you want a modern, fuss-free medicine cabinet that installs quickly without sacrificing durability, this one delivers.
Styles it works with: Modern, Contemporary, Industrial, Minimalist
Best placed in: Master bathroom above vanity, guest bath for a polished look, powder room where space is tight
May not suit: Traditional or farmhouse bathrooms that need white or wood finishes, very small powder rooms where 16 inches wide feels too large, homes where you prefer chrome or brushed nickel hardware throughout
Buy it if:
- You're updating to matte black fixtures and want a cabinet that matches your new aesthetic
- You have the wall depth for recessed install or don't mind a slight surface-mount profile
- You value quick setup and would rather pay a bit more than spend an hour assembling a flat-pack cabinet
Consider waiting if:
- You're hoping for a sale below $80 and can wait for seasonal discounts
- You need to see it in person before committing to the matte black finish
Skip it if:
- You need more than 2.9 inches of storage depth for bulky items
- Your bathroom has a white or brushed nickel theme and matte black would clash
Check the latest price and availability on Amazon before it sells out.


The Venlus 16×24 matte black unit and the TEHOME farmhouse-style 16×24 both hold a 4.6-star rating and share the taller mirror footprint, so the choice between them is finish and frame styling. The TokeShimi runs smaller at 14×18 with a 4.5 rating, and its title notes assembly is required, adjustable shelves, a tempered-glass build, and a beveled aluminum frame. Any of the three fits a standard single stud bay.
Frequently Asked Questions
Can I install a recessed medicine cabinet on any wall?
No. Interior partition walls are the safe target because they’re usually clear of plumbing and insulation. Exterior walls carry insulation and often a vent stack or wiring, so cutting into one is a bigger job and sometimes not worth it. Check the bay through an inspection hole before you decide.
Do I have to cut a stud to fit the cabinet?
Almost never. Standard 14- to 16-inch cabinets are sized to drop into a single stud bay framed 16 inches on center. If your unit is wider than one bay, you’d have to cut a stud and add a header, which turns a simple job into a framing project.
How high should the cabinet go?
Center the mirror around 60 inches off the floor for an average household, then adjust up for taller daily users. The bottom edge usually clears the backsplash and faucet by a few inches. Hold the box to the wall and eyeball it against the person who uses it most before you mark anything.
Is blocking really necessary?
Yes, for a recessed unit. Drywall alone can’t hold the weight of a loaded cabinet and it’ll pull loose. Two 2×4 blocks screwed between the studs at the top and bottom mounting points give the screws something solid to bite, and it’s the step that separates a mount that lasts from one that sags.
What if there’s a wire in the stud bay?
Reroute it or move the cabinet a bay over. That’s why the inspection hole matters before you cut the full outline. A single switch leg is often movable by an electrician in under an hour, but you never cut around a live wire, so kill the breaker first and confirm with a non-contact voltage tester.
Do I need to patch drywall after cutting?
Rarely. A cabinet with a trim flange covers the cut edge on all four sides, so the rough opening never shows. If your unit has no flange, a bead of paintable caulk closes the seam. You only patch drywall if you oversize the hole or change your mind on the location.
How long does the install take?
Plan on a half day for a first-timer, less if the wall is a clear interior partition. Most of the time goes into confirming the bay and cutting clean, not the mounting. Adding blocking and shimming the box square is what pushes a rushed 30-minute job into one that actually holds.
Bottom Line
A recessed medicine cabinet is a half-day job if you confirm what’s behind the drywall first and add blocking before you set the box. Interior walls, a single stud bay, and a level frame are the three things that decide whether it looks built-in or bolted-on. If your only option is an exterior wall with a vent stack in the bay, a surface-mount unit is the smarter call.




Write Your Review
No reviews yet. Be the first to share your experience!