

> Editorial Note: I’m Lauren Ro, and I write furniture buying guides. The picks here are judged on the specs that predict how a piece ages — frame joinery, foam density, and load ratings — checked against BIFMA and FSC certifications plus aggregated owner reports.
A DIY refinish can make a stained, dated tub read as new for a small fraction of a replacement, and the job fails for one reason far more than any other: skipped prep. A coating only bonds to a surface stripped of soap film and mineral scale, so it helps to know how to clean a bathtub before you open a kit. This guide runs the full sequence, and it pairs with our notes on how to unclog a bathtub drain, the best bath caddy tray, the best bathtub tray caddy, and the best freestanding bathtub caddy for once your tub is back in service.
Can You Refinish a Bathtub Yourself?
Yes, on porcelain, enamel, fiberglass, acrylic, and cultured marble. A refinishing kit is a bonded coating you clean, etch, and roll or brush over the existing surface. It isn’t a re-porcelain job, and the result is only as good as your prep and ventilation. Cut a corner and the coating peels in sheets inside a year.

One safety rule isn’t optional. The EPA restricted consumer sale of methylene chloride strippers after deaths in enclosed bathrooms, so skip any stripper listing that ingredient. Open a window and run a fan for the entire job. Low-odor water-based kits sidestep the worst fumes, but ventilation still matters.
What You’ll Need Before You Start
The kit handles the coating, but a few things usually aren’t included. You’ll want 400 to 600-grit wet sandpaper, painter’s tape, a razor scraper, an abrasive cleaner, and a respirator rated for your product. Gloves and drop cloths finish the list.
Two of the picks below are Xmntdo kits, and the split is coverage. The 17.6oz kit is rated for 25 to 30 square feet, roughly one standard tub. The 33oz kit is rated for 50 to 55 square feet, sized for a tub plus a tile surround. Match the ounces to your square footage so you don’t stop mid-coat, because that gap is where lap marks come from.
How to Refinish a Bathtub, Step by Step
Step 1: Strip and deep-clean. Pull the drain and overflow covers, then scrub with an abrasive cleaner until every trace of soap scum, body oil, and scale is gone. Rinse, then rinse again. Residue becomes a weak spot in the bond.
Step 2: Repair chips and cracks. Fill chips with the epoxy filler in your kit, let it set per the label, and sand it flush. A rough repair telegraphs straight through a semi-gloss coat, so give it the extra ten minutes.
Step 3: Etch and sand. Wet-sand the whole surface with 400 to 600-grit paper to kill the gloss and create a mechanical grip. This is the step people skip, and it’s the one ASTM adhesion ratings hinge on: a coating grabs a scuffed profile, not a slick one. Wipe clean and let it dry.
Step 4: Tape and mask. Line every edge, fixture, and wall seam with painter’s tape. Crisp lines separate a refinish that reads as new from one that reads as a patch.
Step 5: Mix and apply. Combine paint and hardener exactly as the label states, since the ratio drives the cure. Roll or brush thin, even coats. Most kits want two to three coats with a light scuff between them. Thin beats thick every time.
Step 6: Cure before water. Patience pays here. Most water-based coatings need 24 to 48 hours before light use and up to 72 hours before a shower or full soak. Rush it and you’ll leave footprints in the finish.
How Long Does a Refinished Bathtub Last?
A careful DIY refinish typically holds three to five years, and a professional spray job can push past ten. Daily wear drives that number more than the product name does. Suction-cup bath mats are the single biggest killer, because the cups grip the coating and tear it loose when you lift them.
Maintenance is simple. Skip abrasive cleaners and bleach, wipe with a soft cloth, and don’t leave standing water or shampoo bottles parked in one spot. Wirecutter’s cleaning coverage makes the same case for sealed surfaces: gentle and frequent beats harsh and occasional.
Refinishing vs. Reglazing vs. Replacing
The terms blur, so here’s the honest map. Refinishing and reglazing describe the same coating process, and most pros use the words interchangeably. Replacement means demo, and that’s where cost multiplies once plumbing and tile enter the picture.
Refinish when the tub is structurally sound but stained, scratched, or an outdated color. Replace when it’s cracked through, leaking behind the wall, or the wrong size for the room. Apartment Therapy’s renovation guidance frames it cleanly: fix the surface when the bones are good, swap the fixture when they aren’t. A coating can’t save a tub that’s failing underneath.
Common Mistakes That Ruin a Refinishing Job
Poor ventilation tops the list, and rushing the cure runs a close second. Both feel like time savers. Both cost you the whole job.
The ones that show up most:
- Skipping the etch: no mechanical grip, so the coating peels off in sheets.
- Thick coats: they sag, trap solvent, and stay soft, so layer thin instead.
- Wrong coverage math: buy for your square footage so you don’t stall halfway.
- Suction-cup mats on fresh coating: they’ll rip it up, so switch to a non-suction mat.
Helpful Products
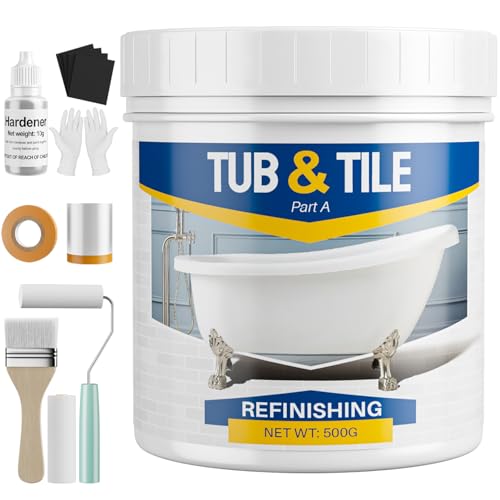
The three kits below are picked on owner rating and fit to a common DIY scenario, and all three are water-based, low-odor formulas built for a home bathroom rather than a spray booth. Start with the Xmntdo 17.6oz kit for a single standard tub, or step up to the 33oz version when you’re coating a tub plus surround. The EZroll roll-on is a US-made alternative, though at a 4.2 rating it sits under the two 4.6 Xmntdo kits, and a gap like that usually signals more unit-to-unit variation, so read the current listing closely first.
Pros
- Complete kit with hardener and application tools included
- Low odor and low VOC formula safe for indoor use
- Easy water-based cleanup during application
- Dries in 24-48 hours with full cure in 7 days
- Versatile for bathtubs, sinks, tile, and countertops
Cons
- No customer reviews yet to verify real-world durability
- Requires 7-day curing period before full water immersion
- May need multiple coats for heavily stained or dark surfaces
This refinishing kit is perfect for anyone staring at a dingy bathtub or outdated tile and dreading the cost of replacement. Instead of spending thousands on a new tub or hiring professionals, you get a complete DIY solution that transforms surfaces in a weekend. The low-odor formula means you are not choking on fumes while you work, and the water-based cleanup is as simple as rinsing your brush under the tap.
What makes this kit stand out is how it removes the guesswork. The hardener comes pre-measured, the tools are included, and the instructions walk you through each step. It works on bathtubs, sinks, tile, even countertops, so you could refresh an entire bathroom with one kit. The semi-gloss white finish looks clean and modern, and the acrylic resin formula holds up in wet environments where cheap paint would peel in weeks.
If you want a fresh bathroom look without demolition or a refinishing quote, this kit delivers a solid DIY option at a fraction of the cost.
Styles it works with: Modern Farmhouse, Scandinavian, Minimalist, Traditional
Best placed in: Bathroom bathtubs, pedestal or vanity sinks, shower tile walls, kitchen or bathroom countertops
May not suit: Homes needing colored finishes beyond white, surfaces with deep cracks or structural damage requiring repair first, renters without landlord approval for permanent modifications
Buy it if:
- Your bathtub or tile is stained, yellowed, or outdated but structurally sound
- You want a weekend DIY project that saves thousands over replacement
- You need a low-odor solution for an apartment or home without strong ventilation
- You are flipping a property or refreshing a rental bathroom on a budget
Consider waiting if:
- You need a color other than white and want to see if more options become available
- You prefer verified customer reviews before trying a new refinishing product
Skip it if:
- Your tub or tile has cracks, chips, or structural damage that needs repair first
- You need immediate use of the bathroom within 48 hours
- You want a permanent solution comparable to professional reglazing with longer warranty coverage
Check the latest price and availability on Amazon before it sells out.

XmntdoTub White Bathtub Refinishing Kit - 33oz Semi-Gloss Paint for Tubs, Tile, Sinks - Covers 50-55 Sq Ft
Pros
- Complete kit includes everything needed for a DIY bathroom refresh
- Water-based formula makes cleanup simple and reduces harsh chemical exposure
- Low odor formulation is more comfortable for indoor projects than solvent-based alternatives
- Affordable way to update bathroom fixtures compared to replacement costs
- Versatile application works on tubs, tiles, sinks, and shower surrounds
Cons
- No customer reviews yet to verify long-term durability claims
- Requires 7-day curing period before full water immersion, limiting bathroom use
- Coverage of 50-55 sq ft may not be enough for larger bathroom projects
- Semi-gloss finish may show imperfections more than a matte would
If your bathtub or tile is looking tired but replacement feels too expensive or invasive, this refinishing kit offers a practical middle ground. The water-based formula is genuinely easier to work with than traditional epoxy coatings, and the low odor means you won't be driven out of your house during application. We appreciate that it works across multiple surfaces, so you can tackle the tub, surrounding tile, and sink in one project for a cohesive refresh.
The 50-55 square foot coverage is realistic for a standard bathtub and immediate surround, though you'll want to measure carefully if your project is larger. The semi-gloss white finish gives a clean, updated look that works in most bathrooms. Yes, you'll need to plan around the 7-day cure time before using the tub normally, but that's standard for durable refinishing products.
If you want to breathe new life into a dated bathroom without the mess and cost of demolition, this kit delivers a budget-friendly refresh that actually lasts.
Styles it works with: Classic, Modern Farmhouse, Coastal, Traditional
Best placed in: Guest bathrooms, master bath tub surrounds, powder room sinks, shower stalls
May not suit: Homes needing colored finishes beyond white, bathrooms that cannot be out of service for a full week during curing, surfaces with extensive cracks or structural damage that need repair before refinishing
Buy it if:
- Your bathtub or tile is stained, discolored, or outdated but structurally sound
- You want to avoid the cost and disruption of full bathroom renovation
- You're comfortable with DIY projects and can follow multi-step application instructions
- You can plan around not using the bathroom for up to a week while it cures
Consider waiting if:
- You need to see verified customer reviews about durability before committing
- Your project area exceeds 55 square feet and you want to confirm coverage
Skip it if:
- You need a color other than white for your design scheme
- Your surfaces have structural damage, deep cracks, or active leaks that need professional repair first
- You cannot go without using the bathroom for the required curing period
Check the latest price and availability on Amazon before it sells out.

Pros
- Low odor compared to traditional refinishing products
- Strong epoxy formula bonds well to problem areas like drains and grout
- High-gloss white finish dramatically transforms worn surfaces
- Clear coverage guidance and video tutorials included
- Made in USA
Cons
- Requires careful prep work for best results
- May need 2-3 kits for larger bathroom projects, increasing total cost
- No customer reviews yet to verify long-term durability claims
This kit tackles one of the most frustrating bathroom problems: a bathtub or tile surround that looks dingy and worn but is structurally sound. Instead of spending thousands on replacement, you get a two-part epoxy system that bonds hard and glossy to create a surface that looks new again.
What sets this apart is the focus on problem areas. Most DIY refinishing kits fail at the drain, overflow, or grout lines where water sits and adhesion is hardest. EZroll engineered this formula specifically to grip those high-stress spots, so you're less likely to see peeling six months later. The low-odor feature is a real bonus if you're working in a small bathroom without great ventilation.
If you want to give your bathroom a dramatic refresh without tearing out tile or replacing a tub, this delivers a professional-grade finish at a DIY price point.
Styles it works with: Modern Farmhouse, Coastal, Traditional, Minimalist
Best placed in: Guest bathrooms, primary bathrooms with dated colored tubs, rental properties needing cosmetic updates
May not suit: Bathrooms with severely damaged or cracked tubs that need structural repair, homes where you plan major renovations within a year, renters without landlord approval for permanent surface changes
Buy it if:
- Your bathtub or tile is stained, yellowed, or outdated but still structurally sound
- You want a bathroom refresh without the cost and mess of full replacement
- You're comfortable following detailed prep and application instructions for best results
Consider waiting if:
- You need a color other than white and want to see if other options become available
Skip it if:
- Your tub has cracks, chips, or structural damage that need repair first
- You're not willing to invest time in thorough surface prep and proper application technique
Check the latest price and availability on Amazon before it sells out.
Frequently Asked Questions
How long before I can use a refinished tub?
Plan on 24 to 48 hours for light use and up to 72 hours before a shower or soak. Your kit’s label sets the exact window, and cooler, humid bathrooms cure slower.
Can I refinish a fiberglass or acrylic tub?
Yes. Etch it well, since these surfaces are slicker than porcelain and lean even harder on that scuffed profile for adhesion.
Do I need to remove the old finish first?
No stripping to bare material. You clean, repair, and etch the existing surface so the new coating bonds to it. Full removal is only for a failed prior refinish that’s already peeling.
Is bathtub refinishing safe to do at home?
It’s fine with real ventilation and a proper respirator. Avoid any methylene chloride stripper, which the EPA restricted for consumer use, and keep a window open and a fan running start to finish.
Why did my last refinish peel?
Almost always prep. A surface that wasn’t fully degreased or etched, or a coating rushed into service before it cured, lifts within months.
Bottom Line
Refinishing works when the tub is sound and you respect the prep and the cure. Clean it until it squeaks, etch it until it’s dull, apply thin coats, and give it 72 hours before water. For a single standard tub the Xmntdo 17.6oz kit is the straightforward choice, and you size up to the 33oz kit when a surround is part of the job. Replace the tub instead if it’s cracked through or leaking, because no coating fixes what’s failing underneath.

Write Your Review
No reviews yet. Be the first to share your experience!